News
News items are how you publish stories, announcements, and updates to your membership. News can be displayed union-wide or scoped to a specific bargaining unit or group.
The News Items page lists every story for the current scope. It has three tabs — All, Featured, and Not featured — with a count next to each so you can see at a glance how many stories are in each bucket. A search box above the list filters by title and body text in real time.
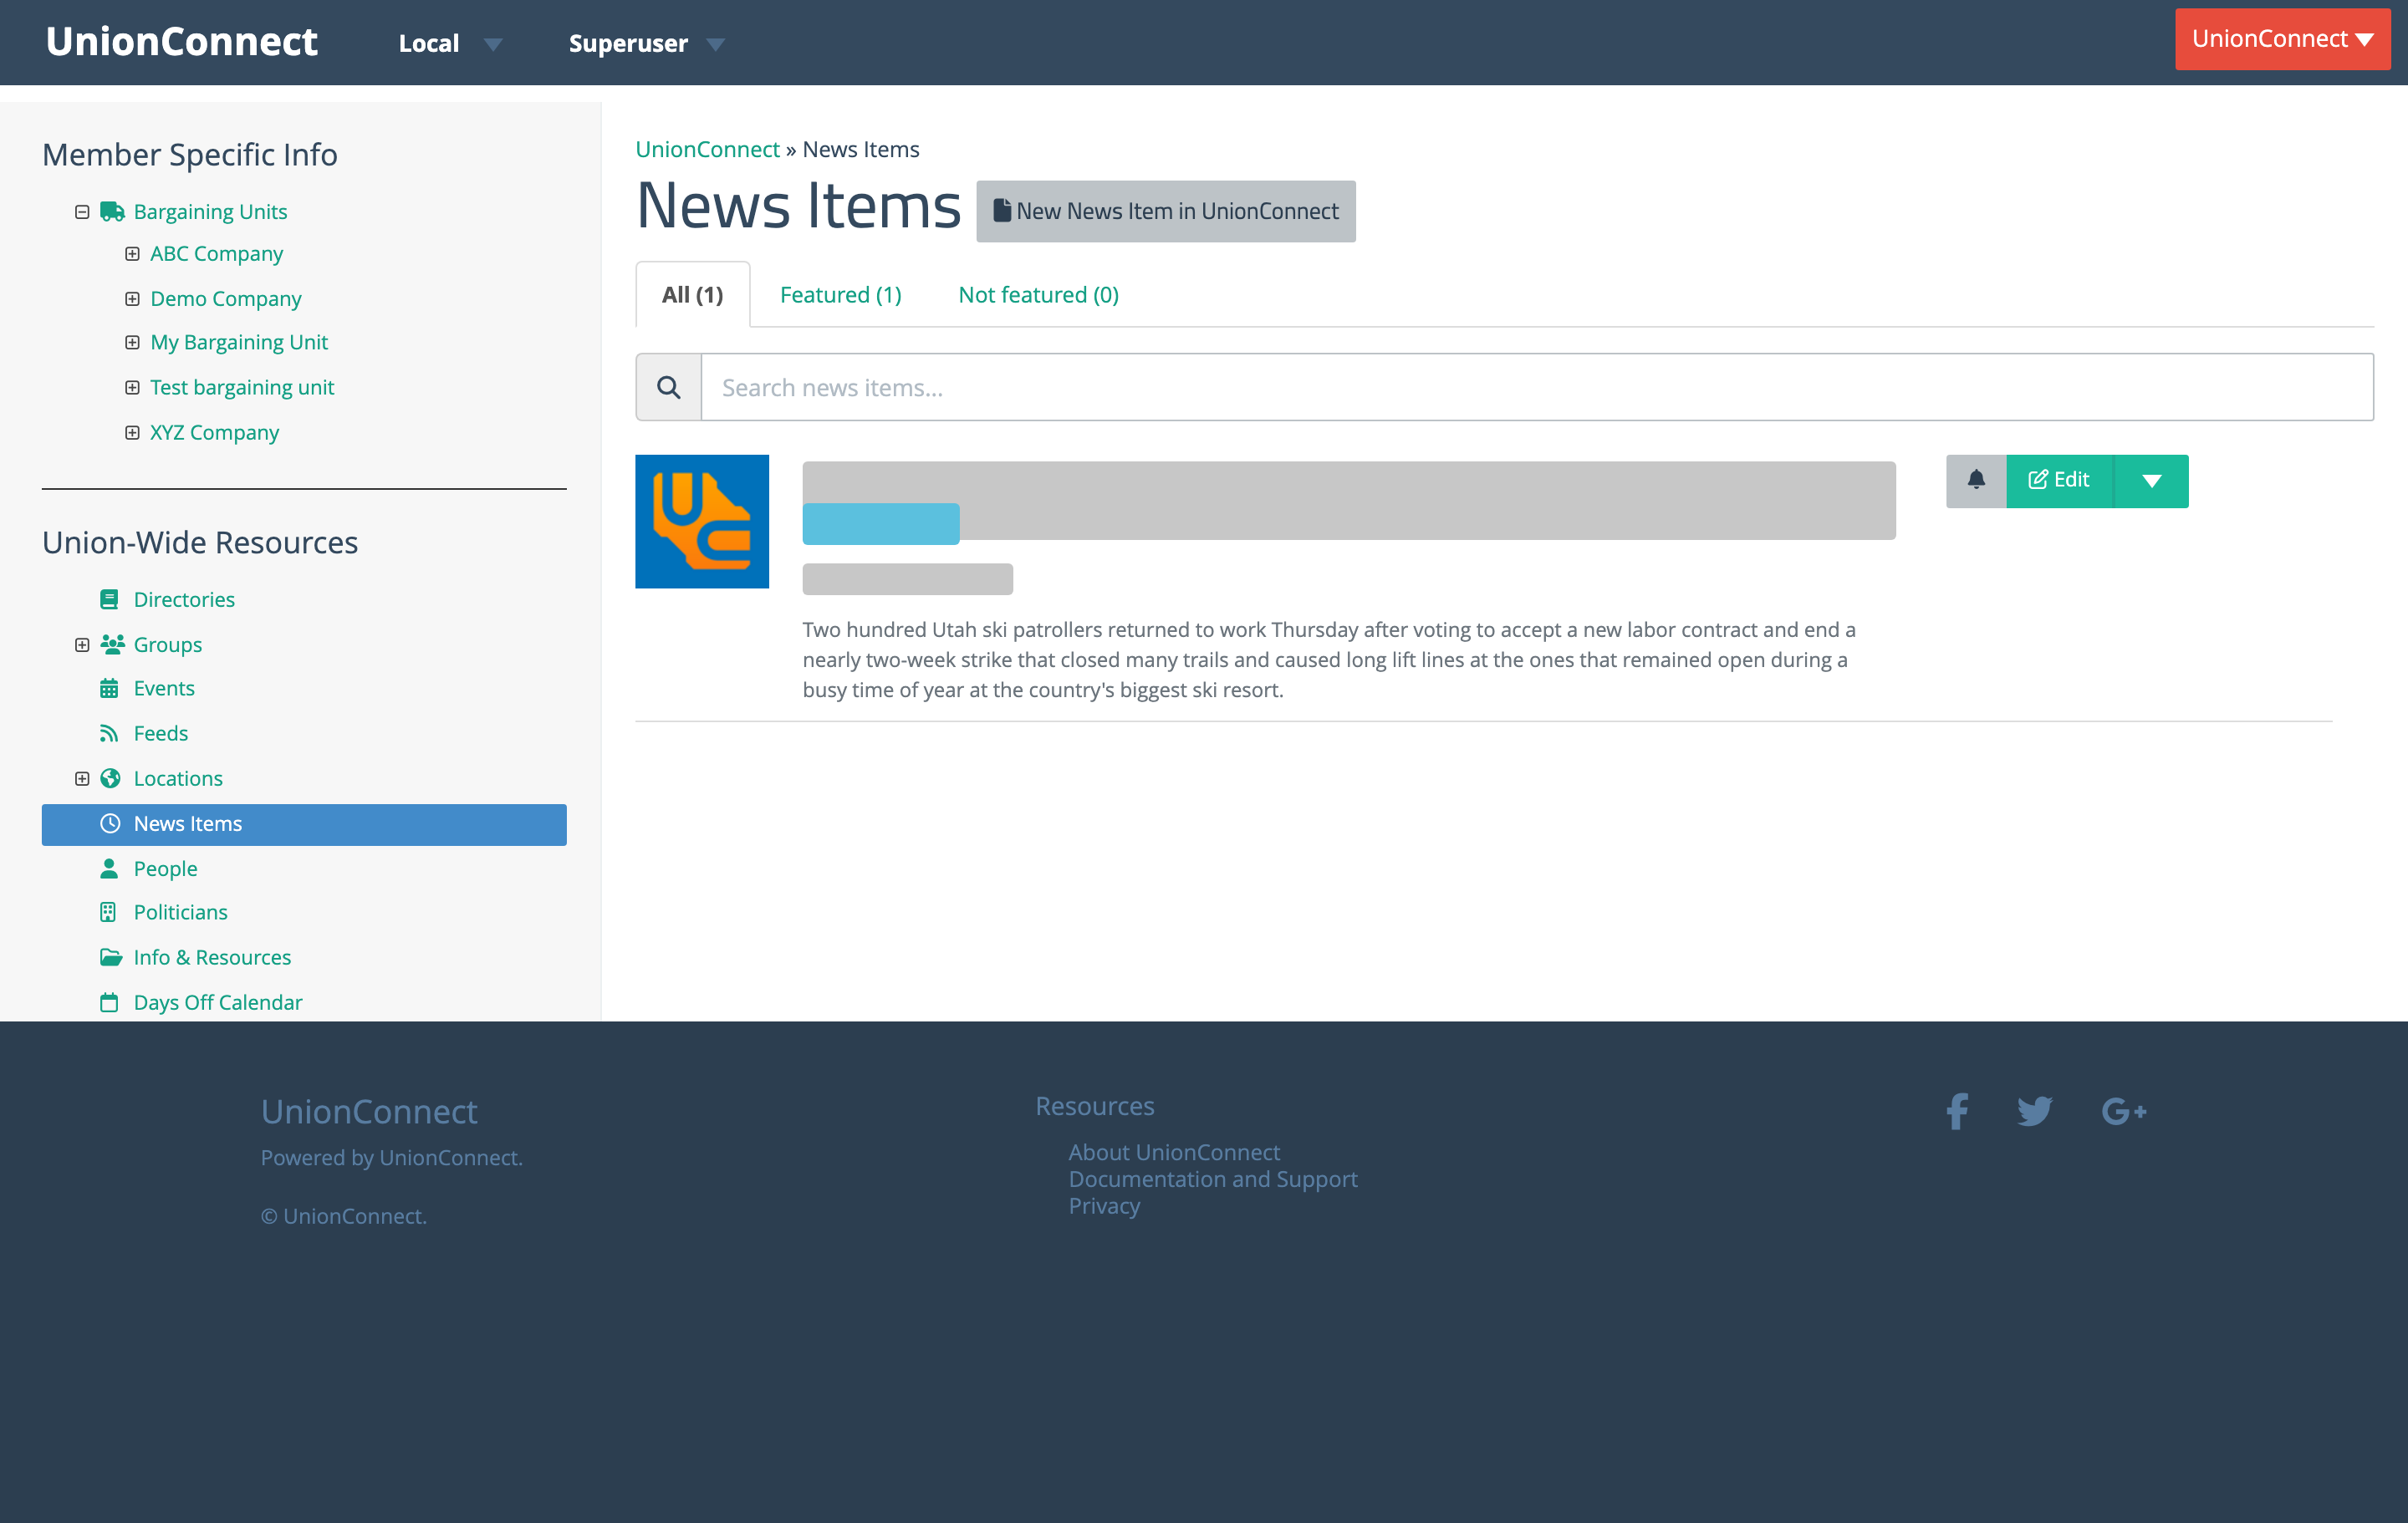
Each story shows the feature image, the headline (linked to the full story), a Featured Article badge if applicable, the date the story was added, and the first part of the body text. If the body is long it’s truncated with a Read more toggle so the list stays scannable.
Adding a News Story
- Login to the dashboard
- From the left menu, click the News Items item under whichever section you want to add it to (specific bargaining unit, group, or union-wide section)
- Click New News Item in… at the top of the list
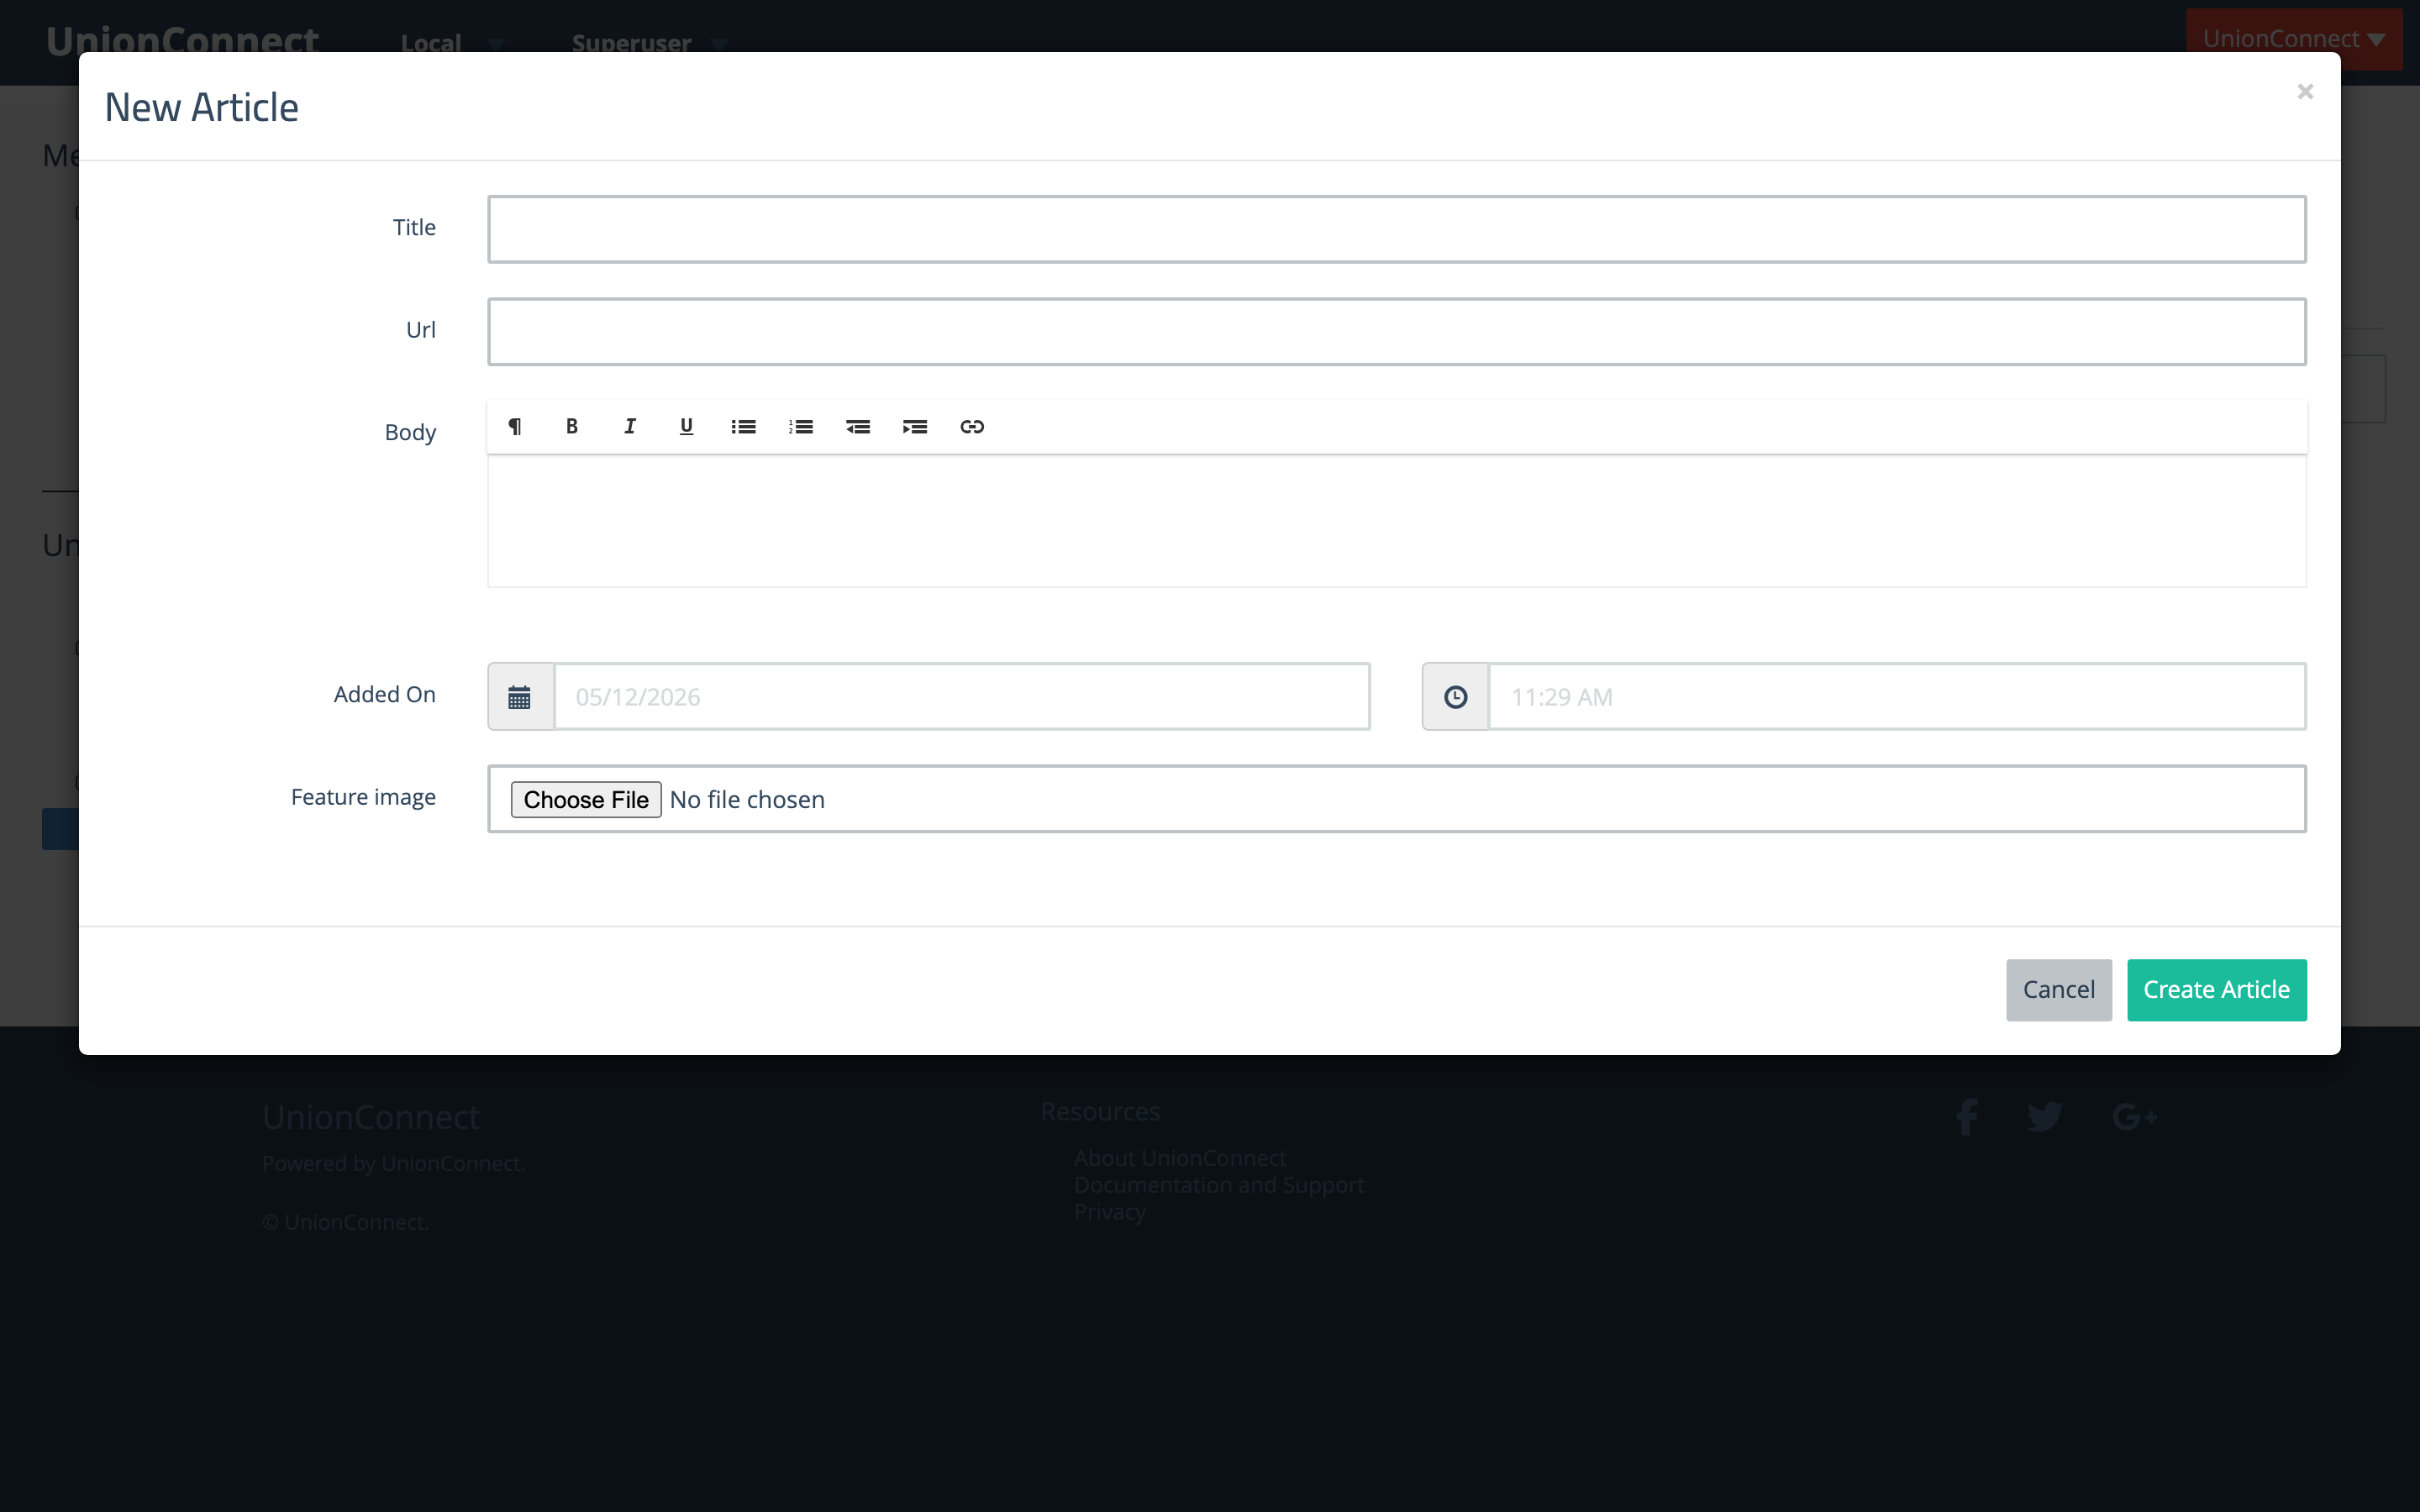
- Fill out the New Article form
- Title — The headline of the article
- URL — Optional. If set, tapping the article in the app opens this link (useful for linking to a longer story or external coverage)
- Body — The body text. The editor has formatting controls for headings, bold, italic, underline, bulleted and numbered lists, indent/outdent, and links
- Added On — The date and time the article should be dated. Defaults to now. Useful for backdating an older announcement or scheduling the article’s display date
- Feature image — Optional. The image that appears at the top of the article and next to the headline in the news list and (if featured) on the app’s home screen
- Click Create Article to publish
Viewing and Editing a Story
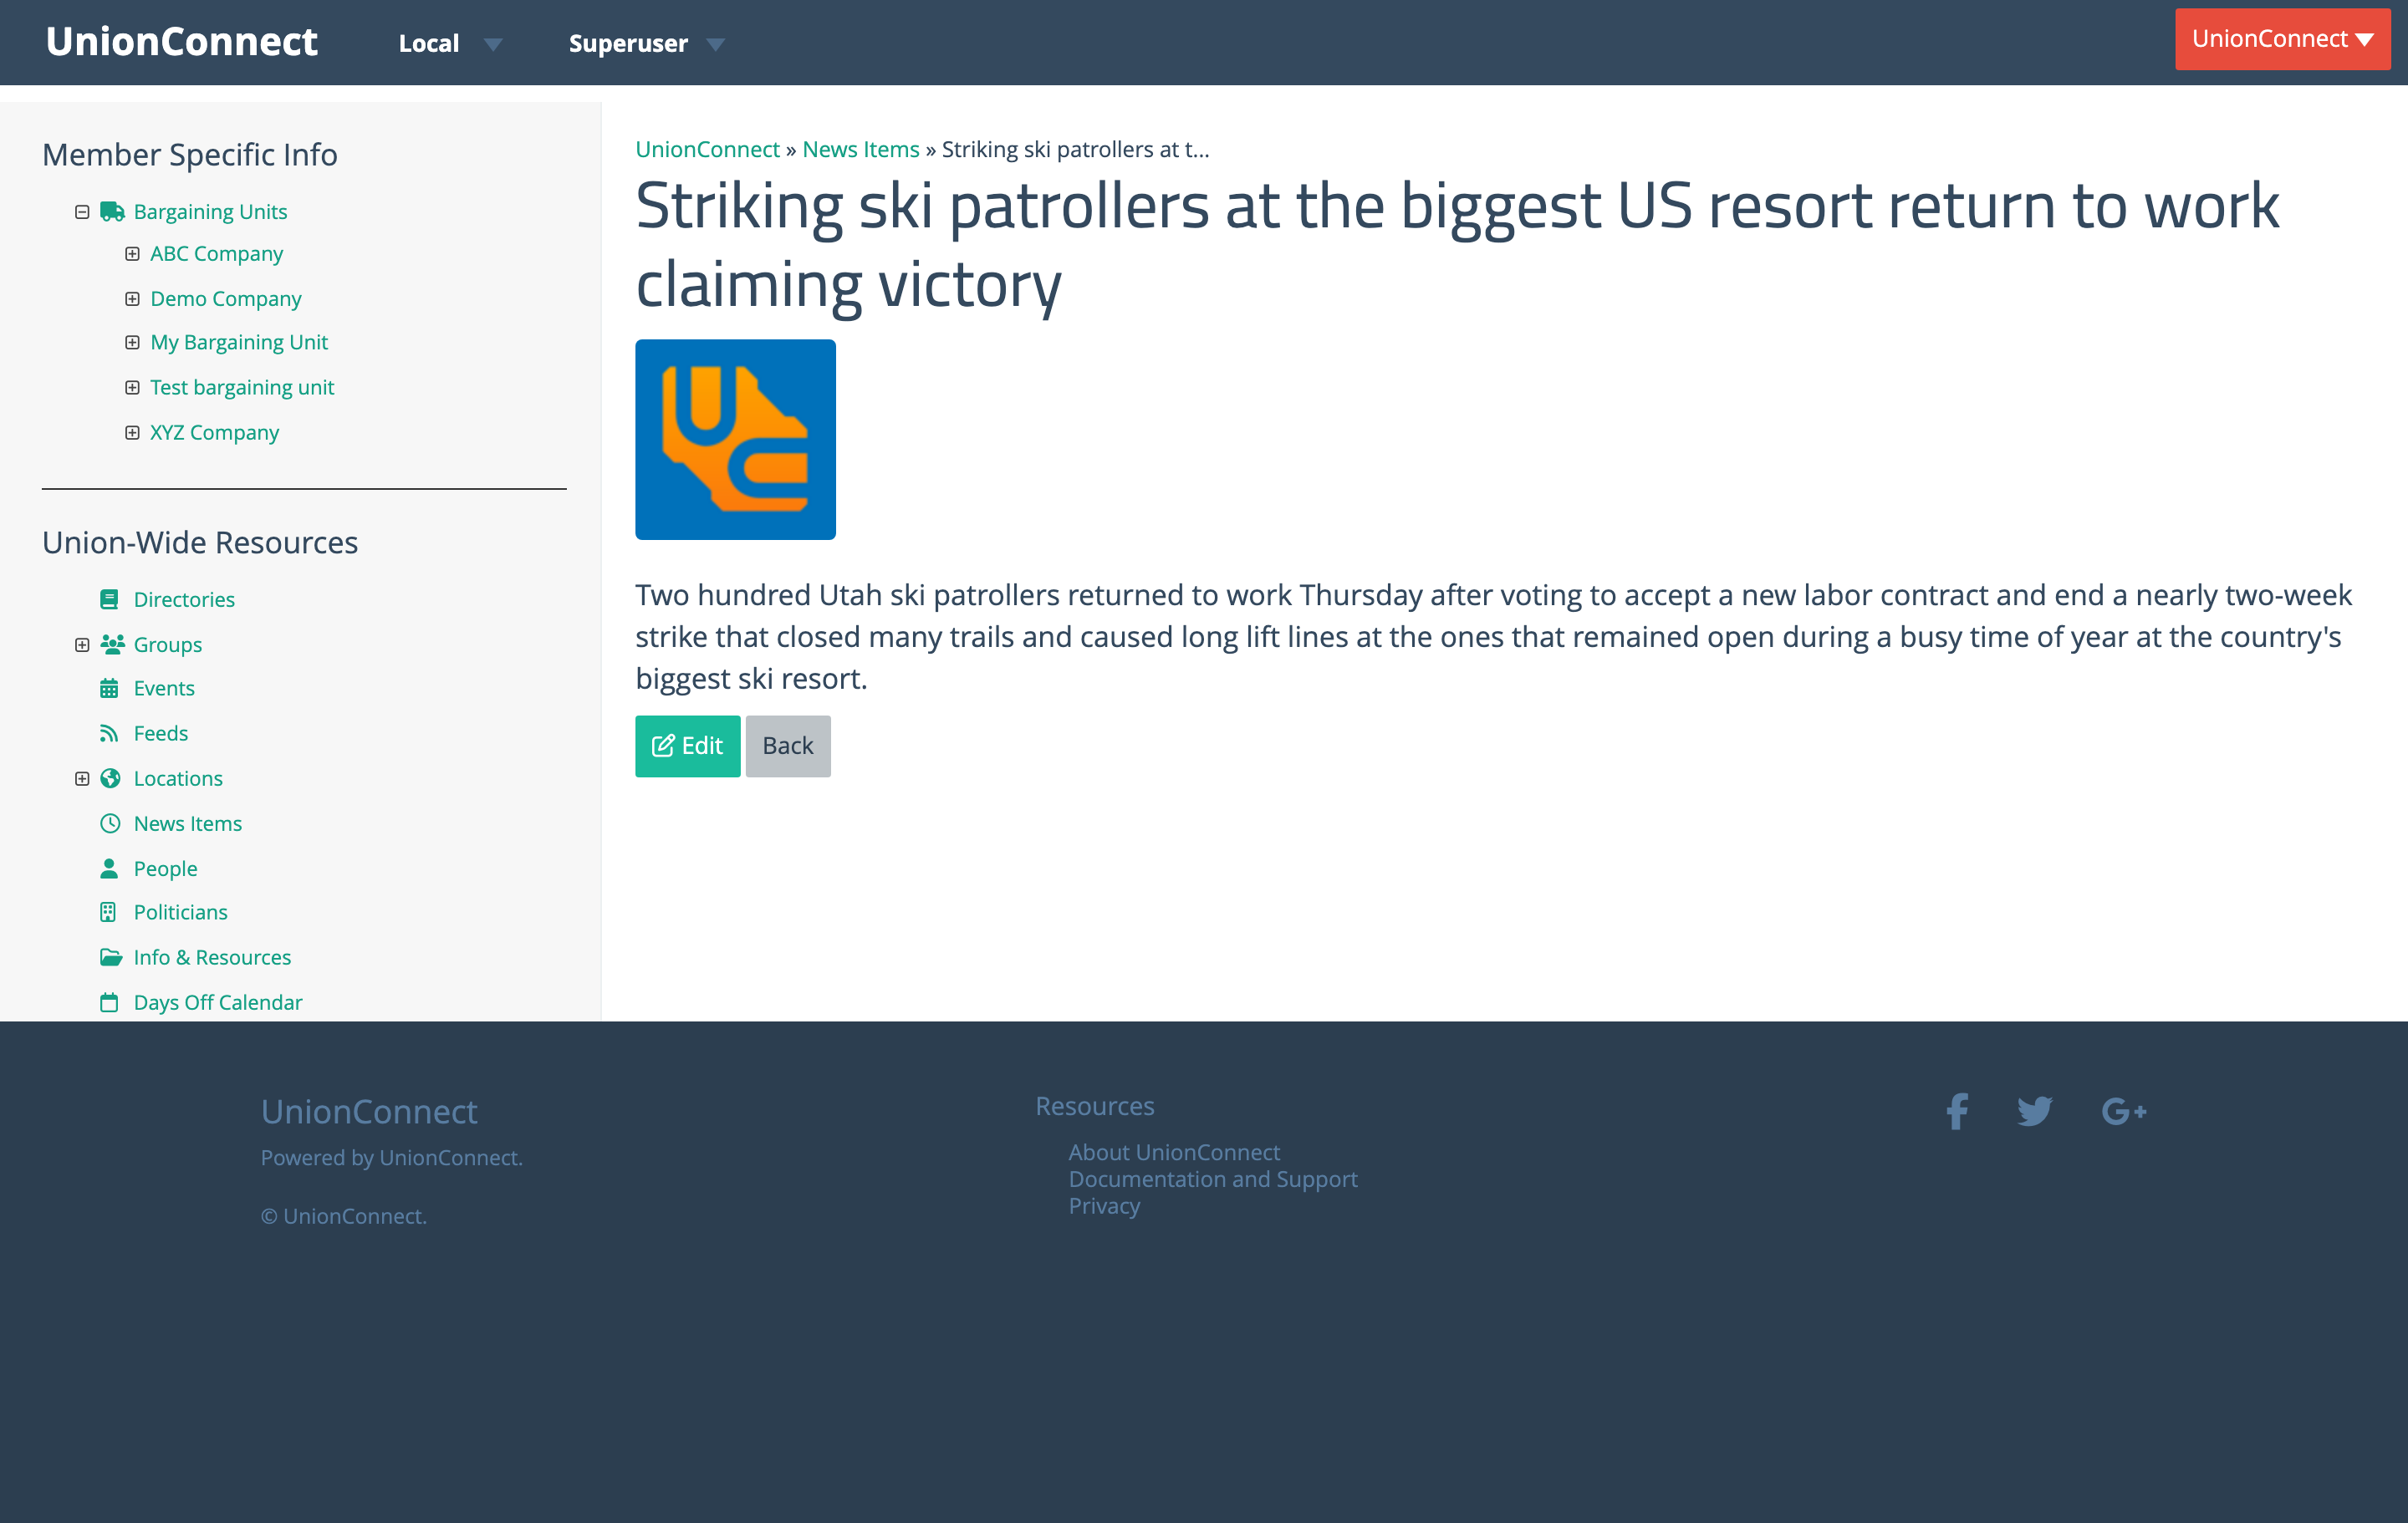
Click the headline of any story in the list to open the article view page. The page shows the feature image, headline, and full body, with Edit and Back buttons at the bottom. Edit opens the same modal as creating a new article, pre-filled with the article’s current values.
Story Actions
Each story row has a green Edit button with a dropdown caret. Click the caret to see the rest of the actions.
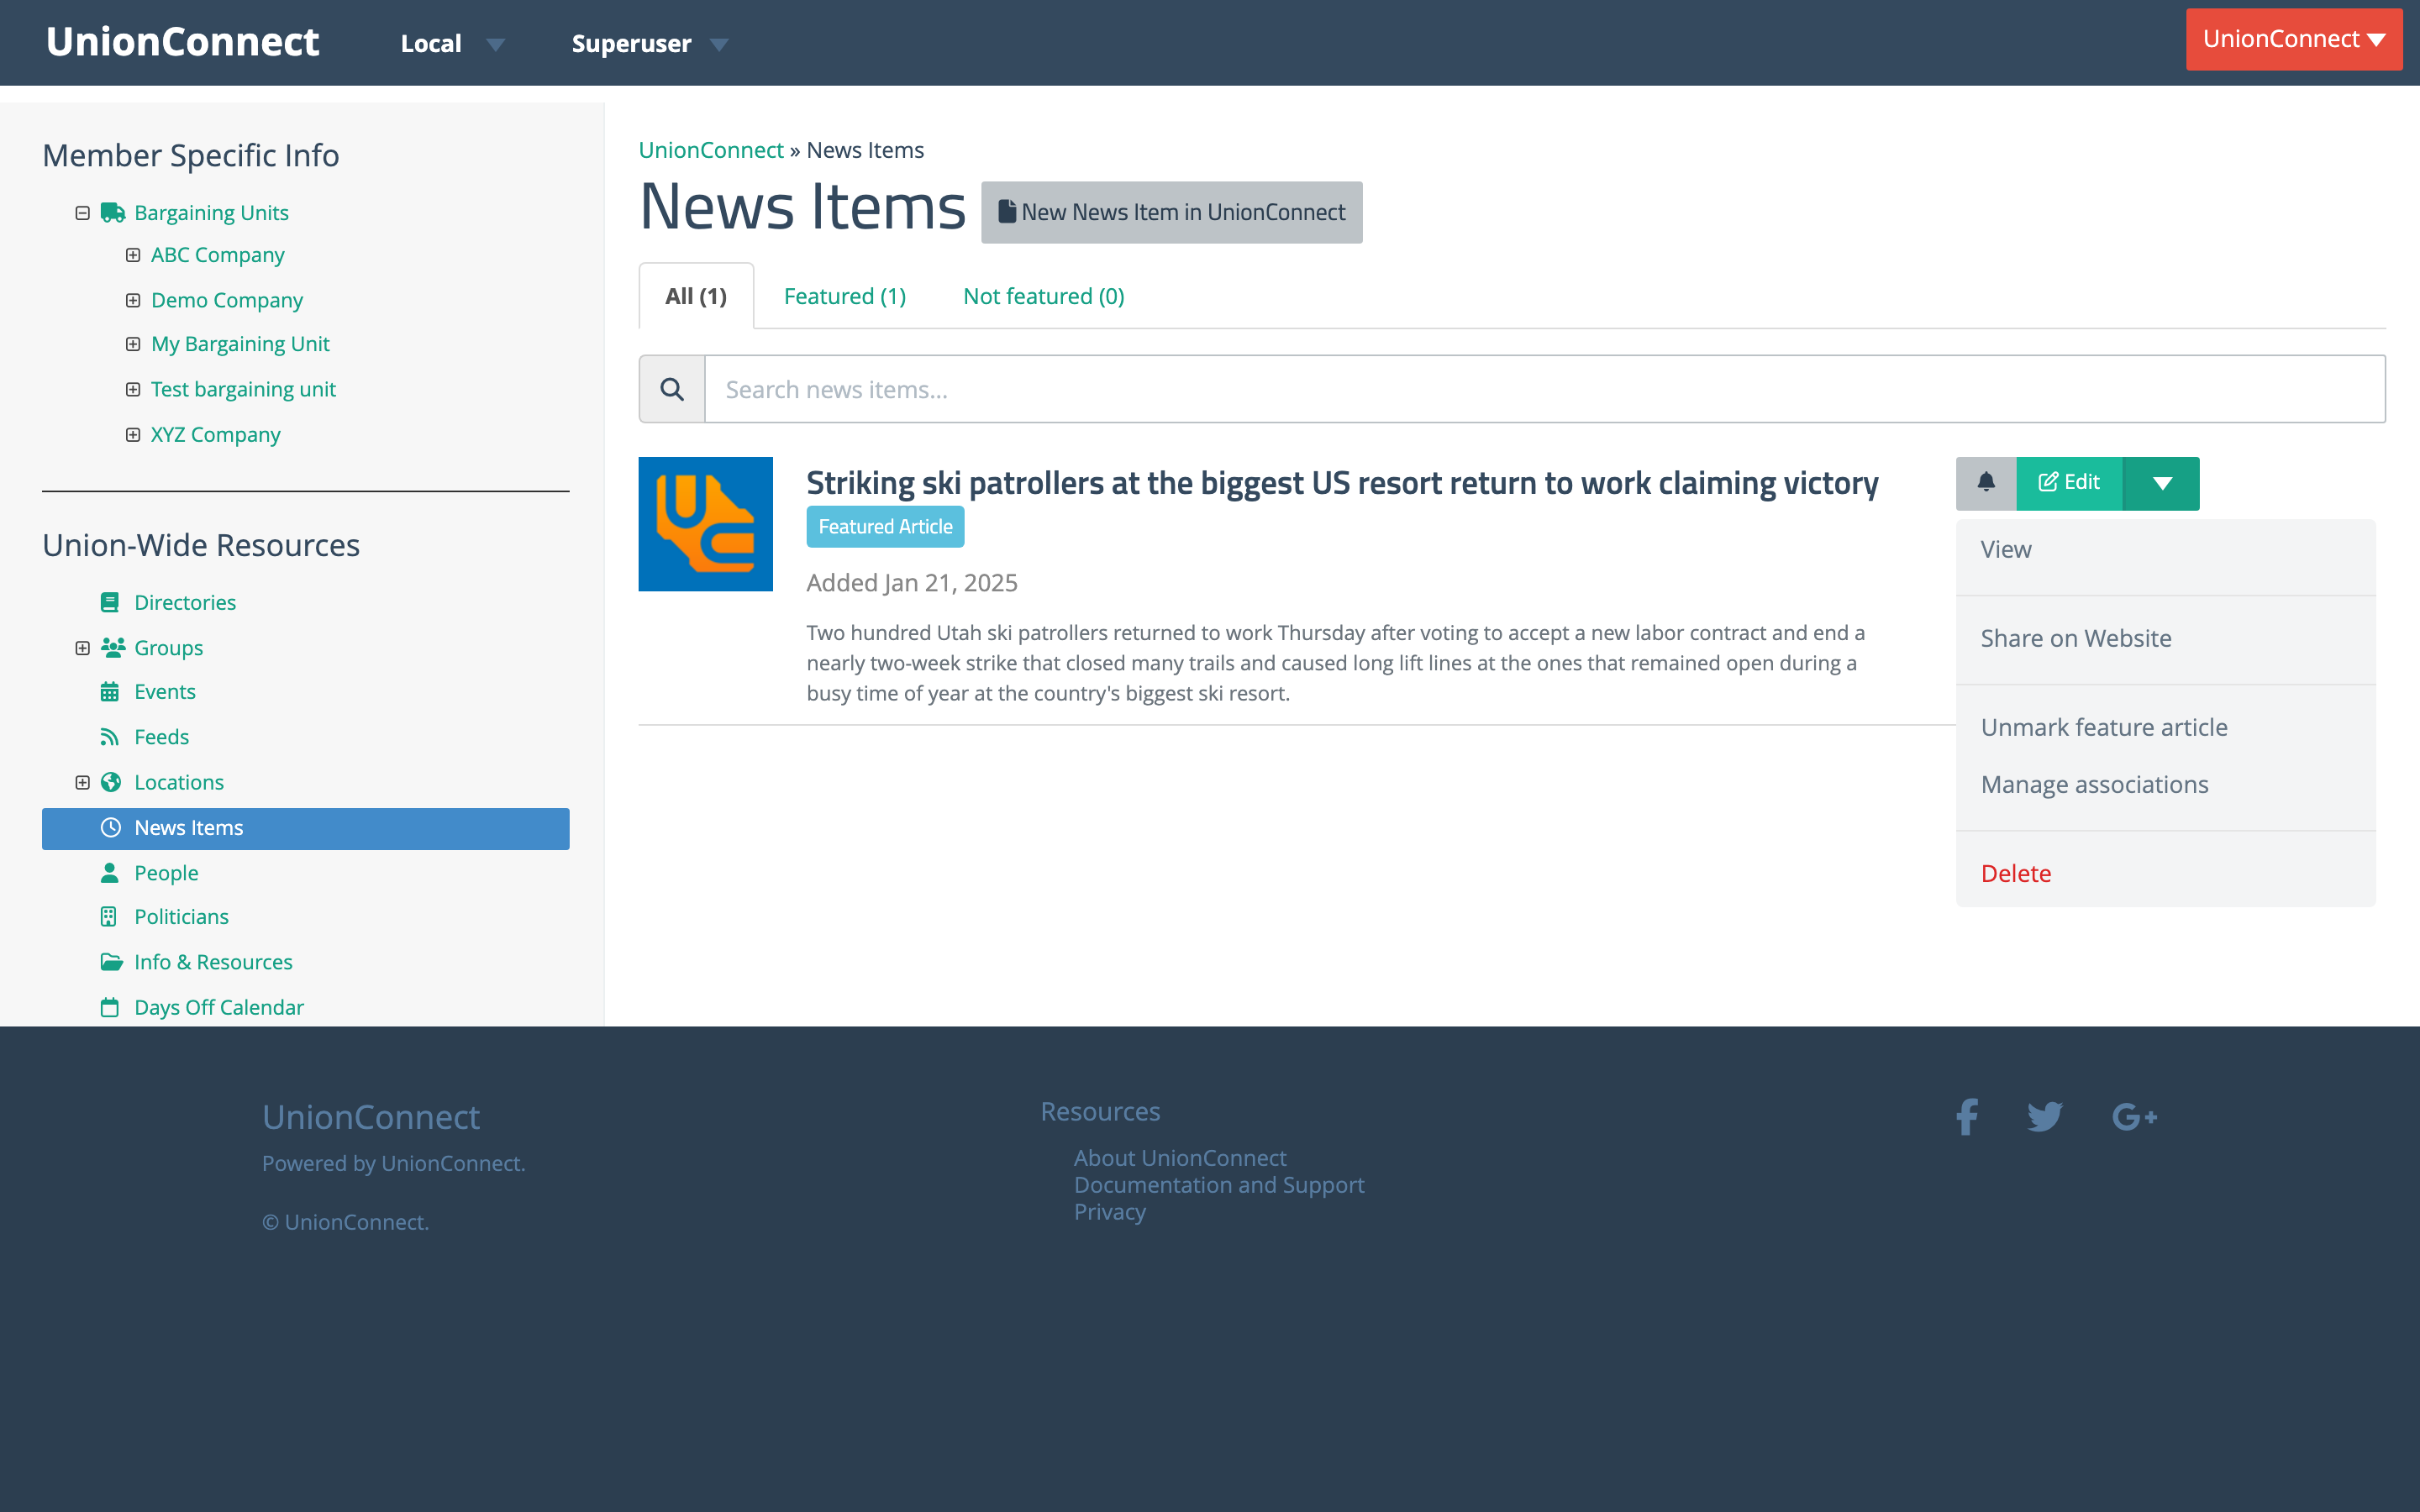
- View — Open the article view page (same as clicking the headline)
- Share on Website — Generates a shareable public URL for the article
- Mark as feature article / Unmark feature article — Promote the article to the app’s home screen (or demote it). If Allow multiple feature articles is on, you can feature more than one story at a time
- Manage associations — Change which bargaining units, groups, or scopes the article appears in
- Delete — Permanently remove the article
Featuring a Story
Featuring a story makes it appear on the home page of the app above the menu items. You can mark more than one story as featured if you have the Allow multiple feature articles setting set to on.

- Login to the dashboard
- Find the story under the bargaining unit, group, or union-wide section where it lives
- Click the dropdown caret next to the story’s Edit button and choose Mark as feature article
Featured stories show a green Featured Article badge in the list and are included on the Featured tab.
Changing Where a Story Appears
Use Manage associations from the story’s dropdown to move or copy an article between bargaining units, groups, or the union-wide section.
- Find the story in the news list
- Click the dropdown caret next to Edit and choose Manage associations
- Check off every scope where the article should display, then save
Deleting a Story
Click the dropdown caret next to the story’s Edit button and choose Delete. Deletion is immediate and removes the story from every scope it was associated with.
Feeds
Feeds pull news from external RSS sources into the app’s Latest News list. Use feeds to surface, say, your international’s news, a labor news site, or your local newspaper alongside the stories you write yourself.
Feeds can be added union-wide or to a specific bargaining unit or group. Feeds are fetched automatically every hour, and stories show up in members’ news lists shortly after the next fetch. You can also pull articles right away from the feed’s row menu.
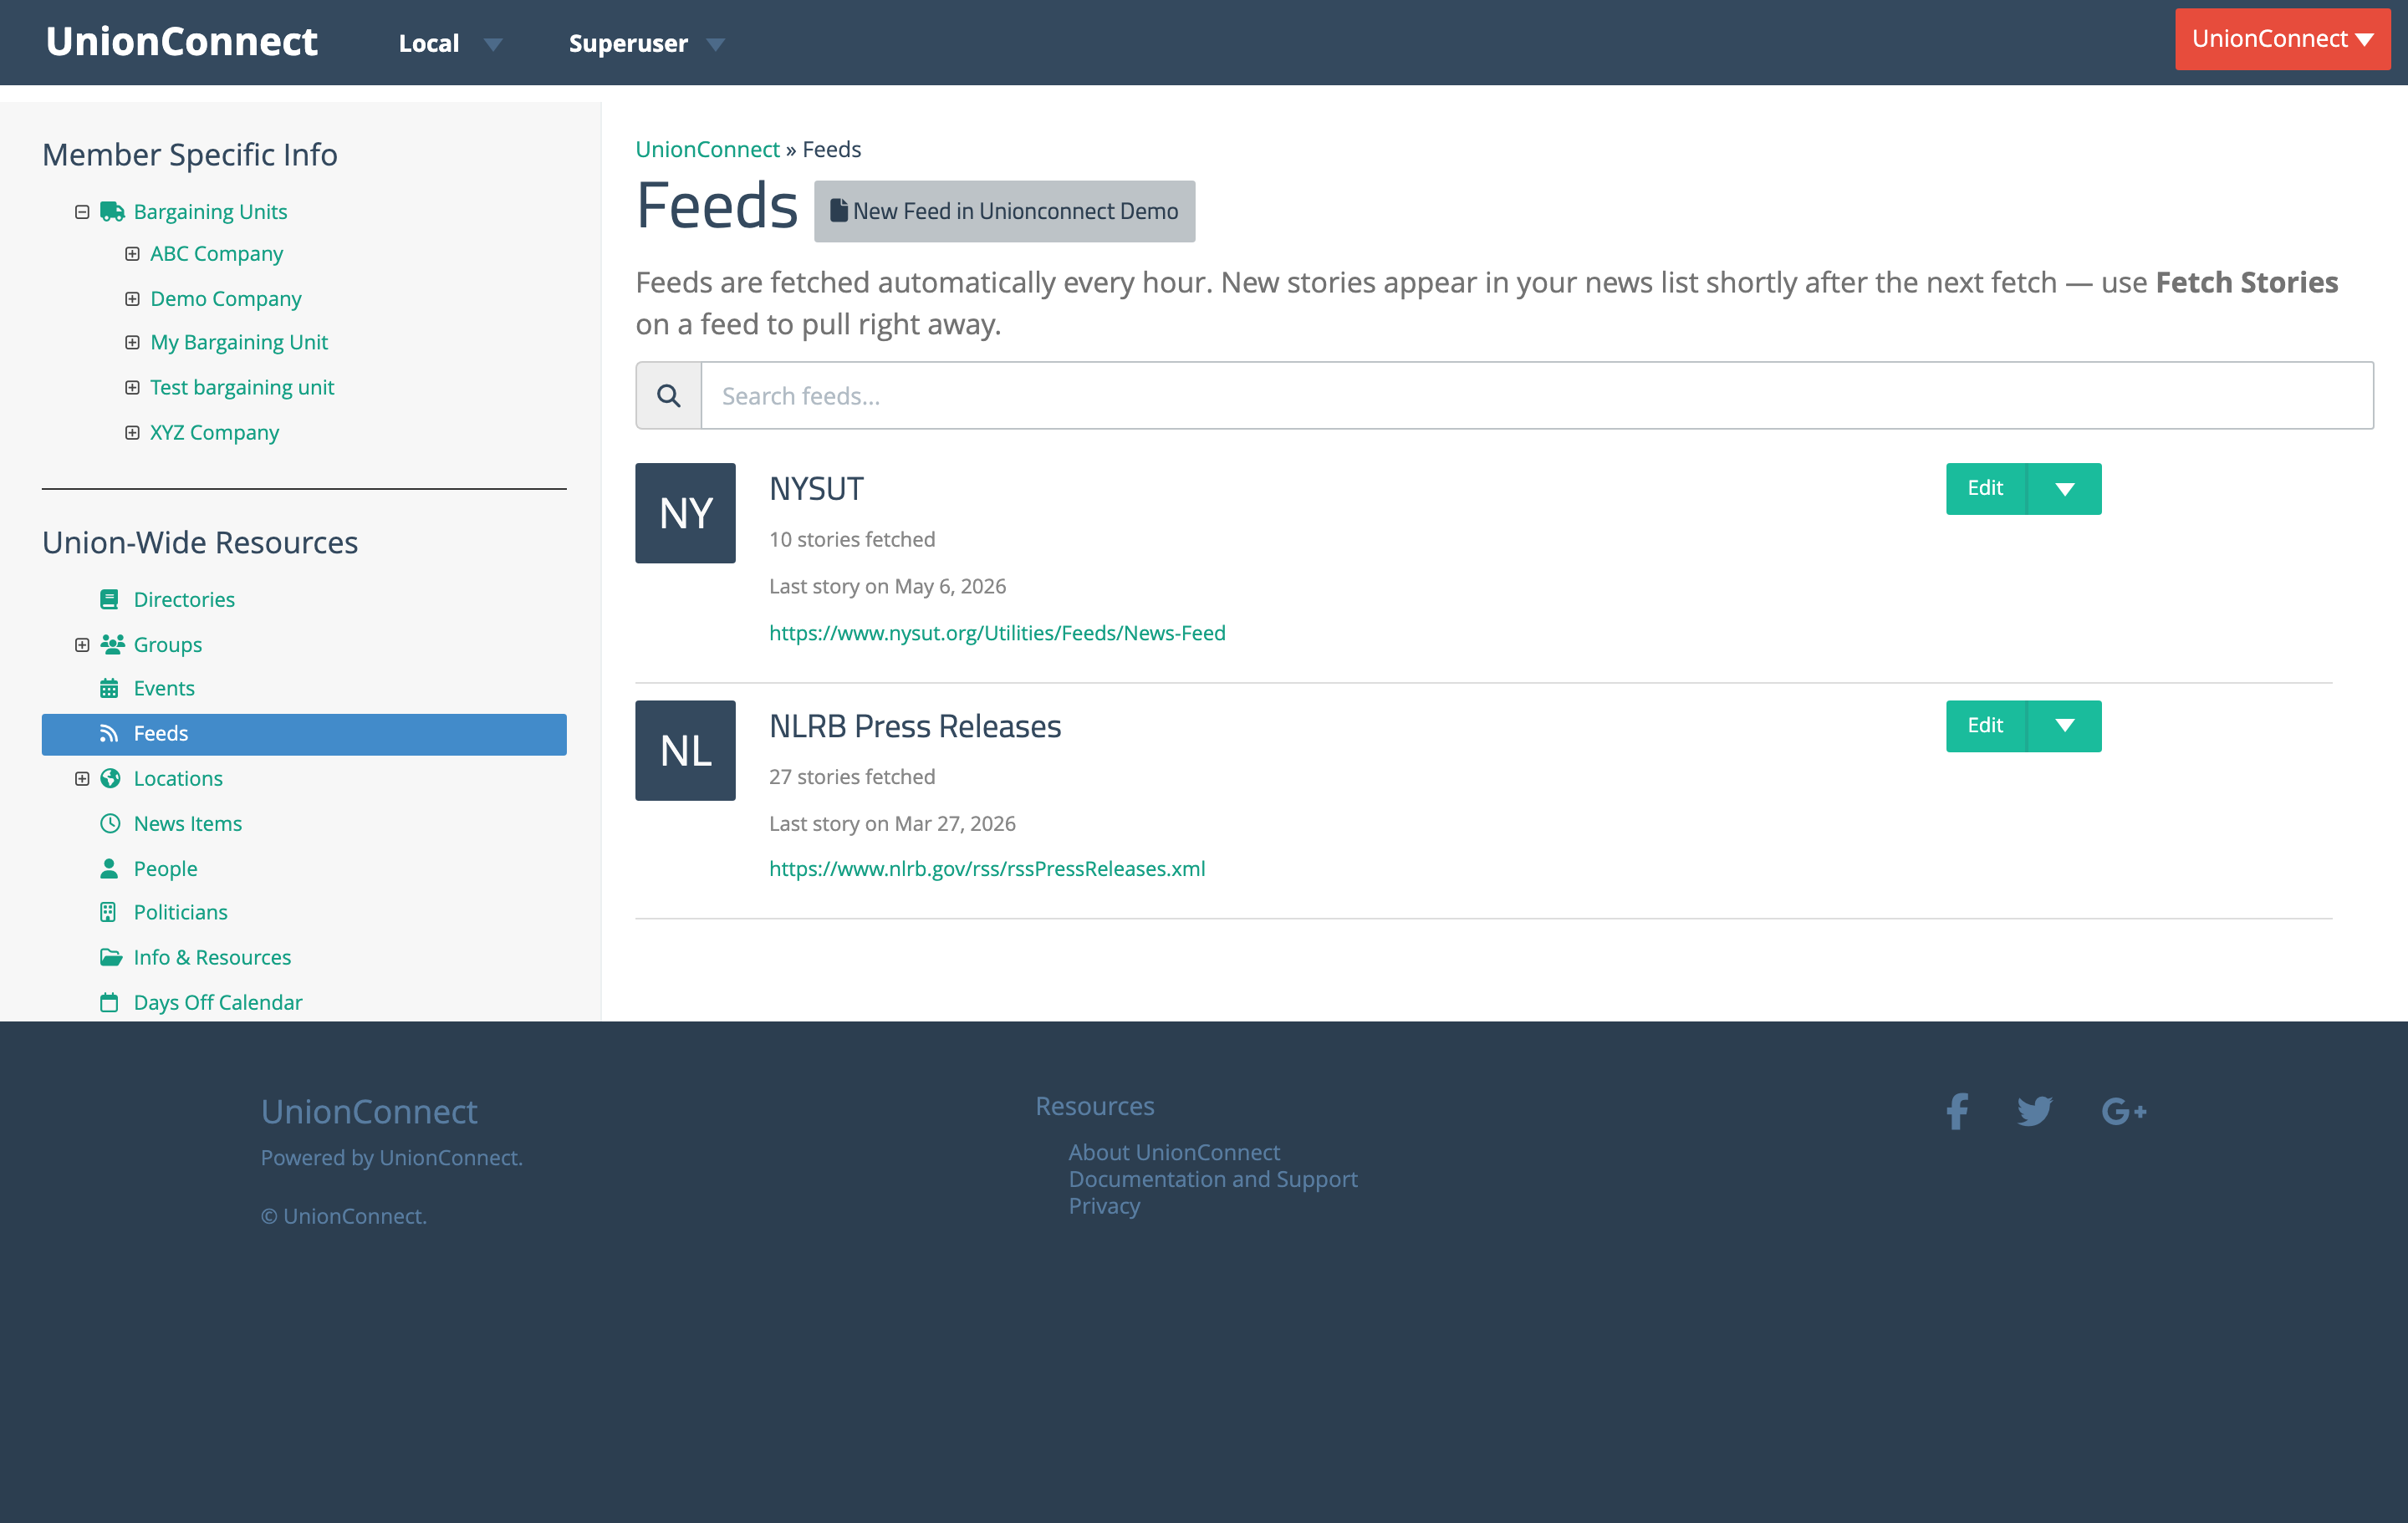
Each feed row shows the feed name, how many stories have been fetched so far, when the most recent story was published, and the source URL. The search box filters feeds by name or URL.
Adding a Feed
- Login to the dashboard
- From the left menu, click the Feeds item under whichever section you want to add it to (specific bargaining unit, group, or union-wide section)
- Find the RSS feed URL for the source you want. Most news sites publish an RSS feed; if you can’t find one, paste the site’s URL into an RSS feed extractor
- Click New Feed in…
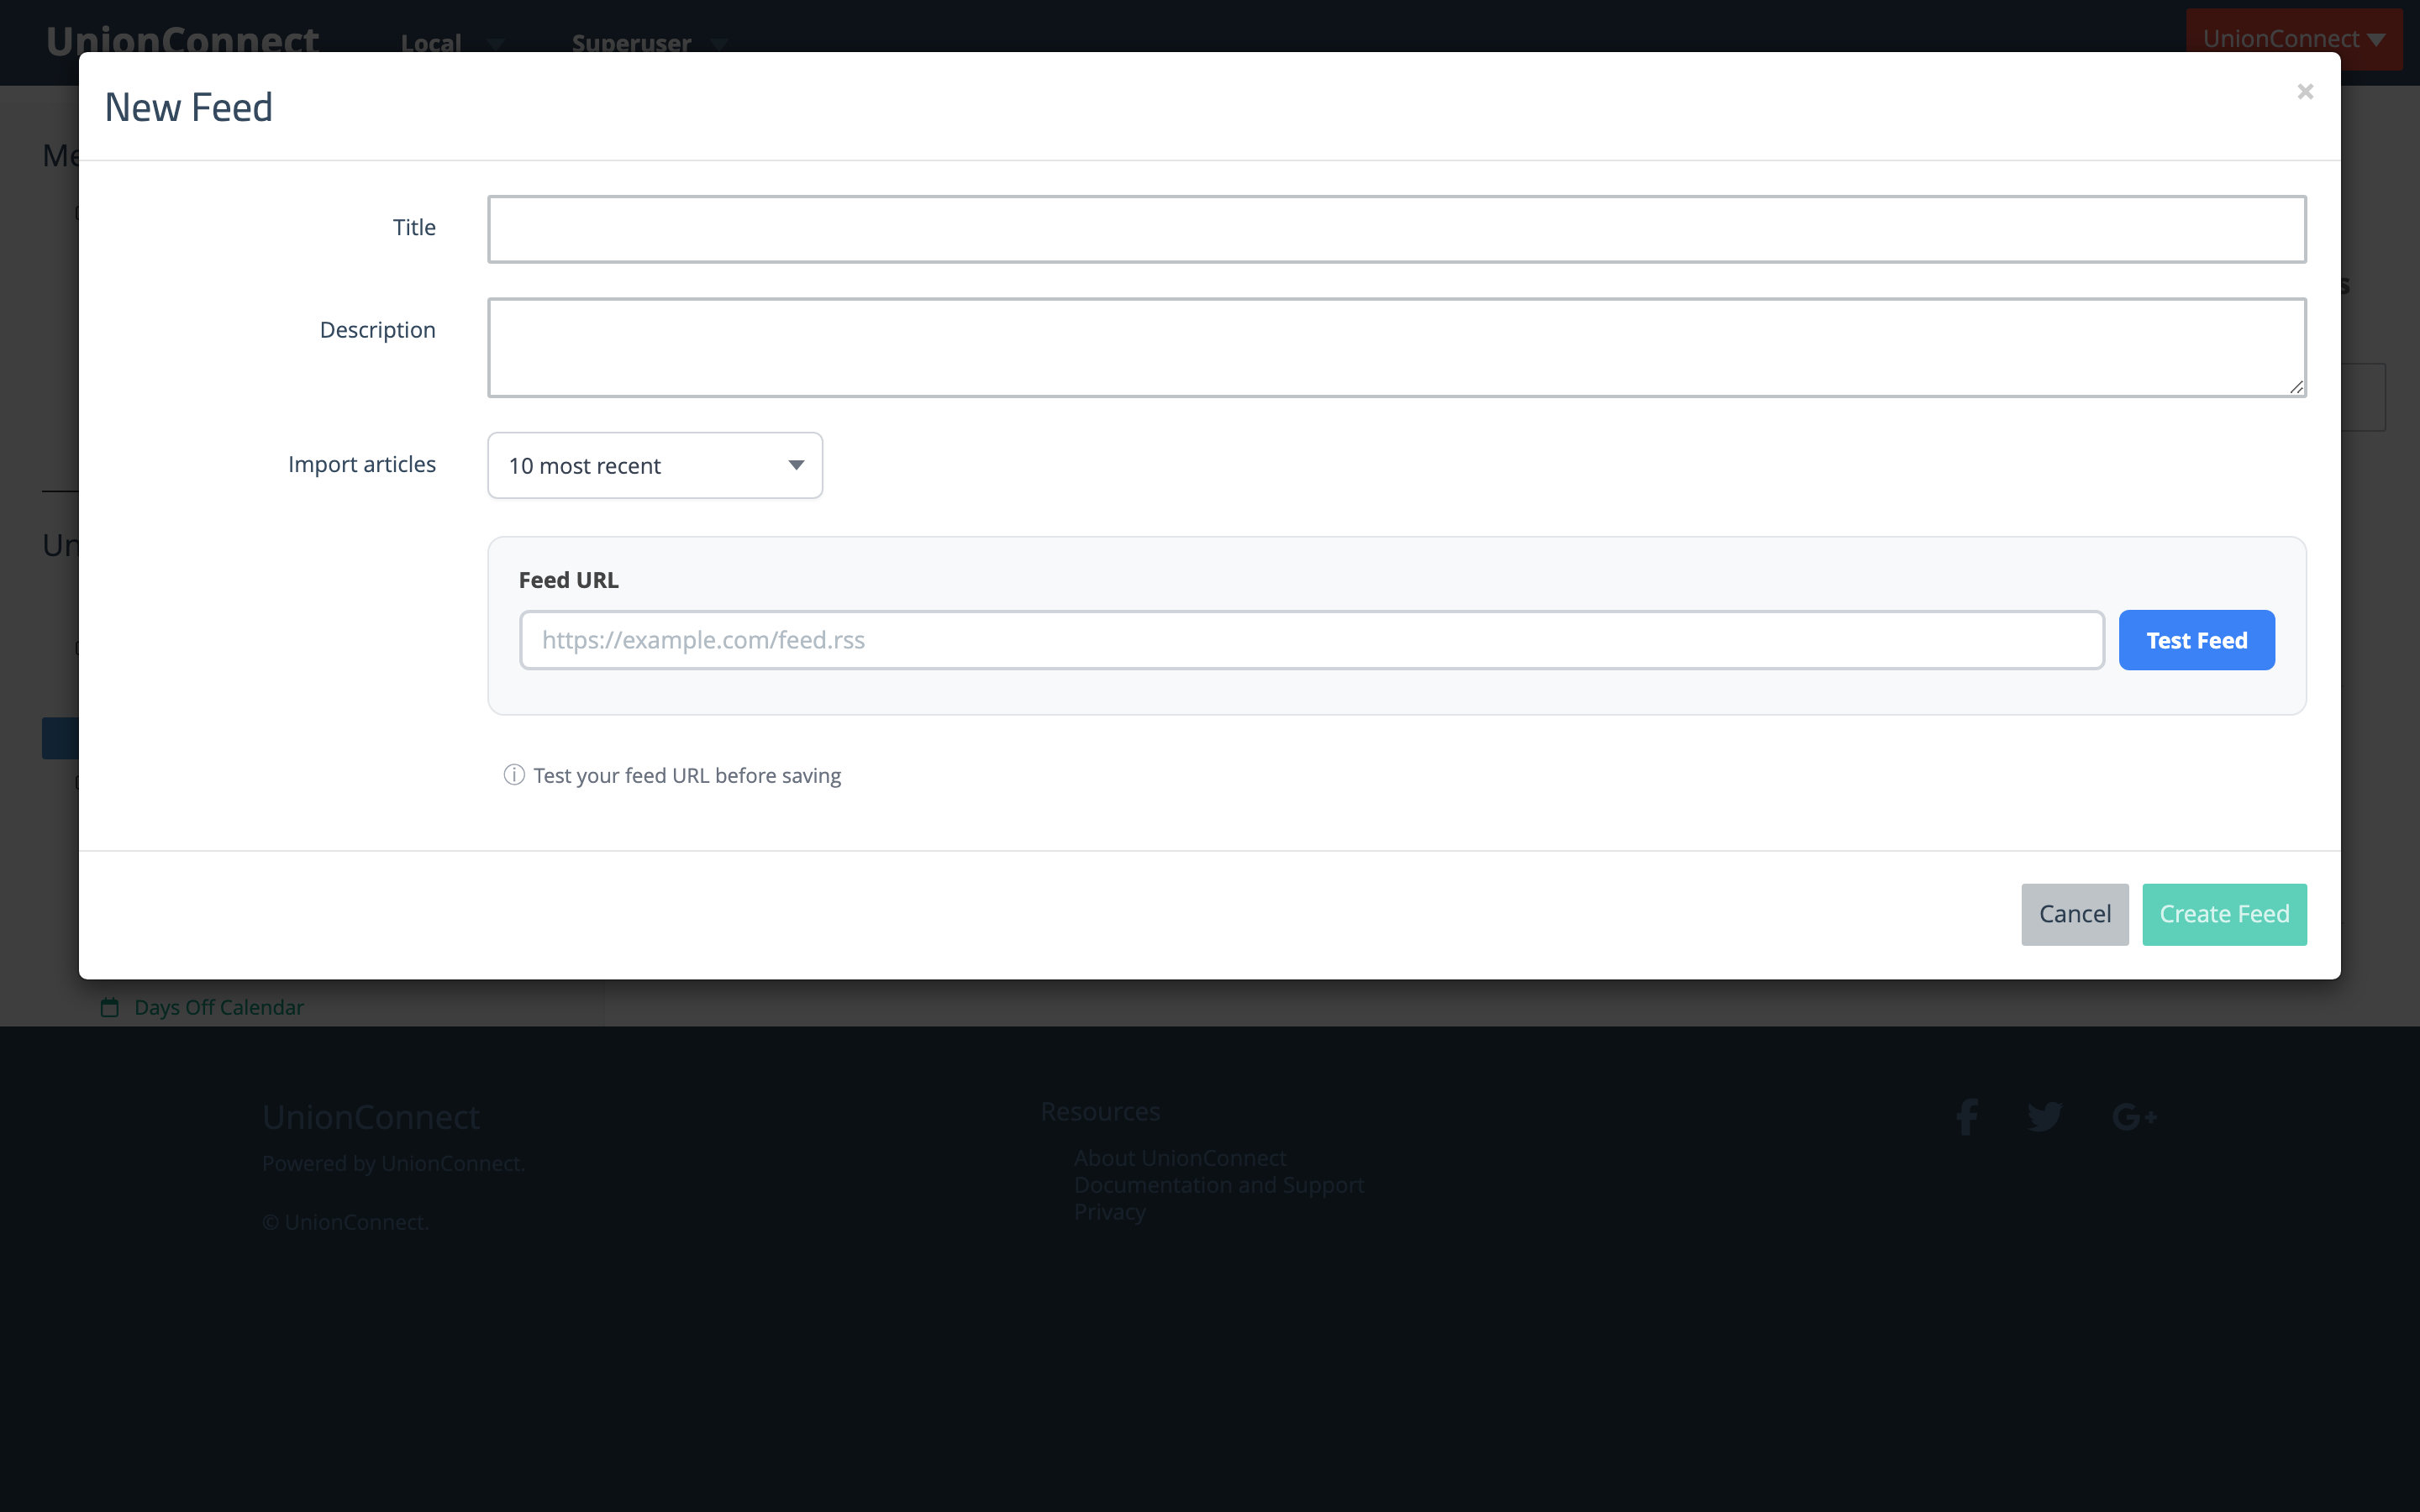
- Fill out the New Feed form
- Title — A short name for the feed as it will appear in the admin list (members see article titles, not the feed name)
- Description — An optional internal description to help you remember what the feed is for
- Import articles — How many of the feed’s current articles to pull in when you first create it. Choose 10, 25, 50, or whatever the dropdown offers. After creation, new articles are pulled automatically each hour
- Feed URL — The RSS feed URL itself. Click Test Feed to verify the URL parses correctly before saving — a successful test shows how many articles were found and confirms the feed is reachable
- Click Create Feed. Once a feed has tested successfully, its initial batch of articles starts importing in the background
Managing a Feed
The dropdown next to each feed’s Edit button has the rest of the actions:
- Fetch Stories — Pull new articles from the feed right now instead of waiting for the hourly schedule. Useful when you’ve just published something on the source site and want it to appear in the app right away
- Manage associations — Change which bargaining units, groups, or scopes the feed broadcasts to
- Delete — Remove the feed. Articles already imported stay; no new ones are pulled
Events
Events let you publish upcoming meetings, conferences, picnics, and other gatherings to your membership. Events appear in the app’s Events list, where members can RSVP, view location and time details, and tap through to any linked URL.
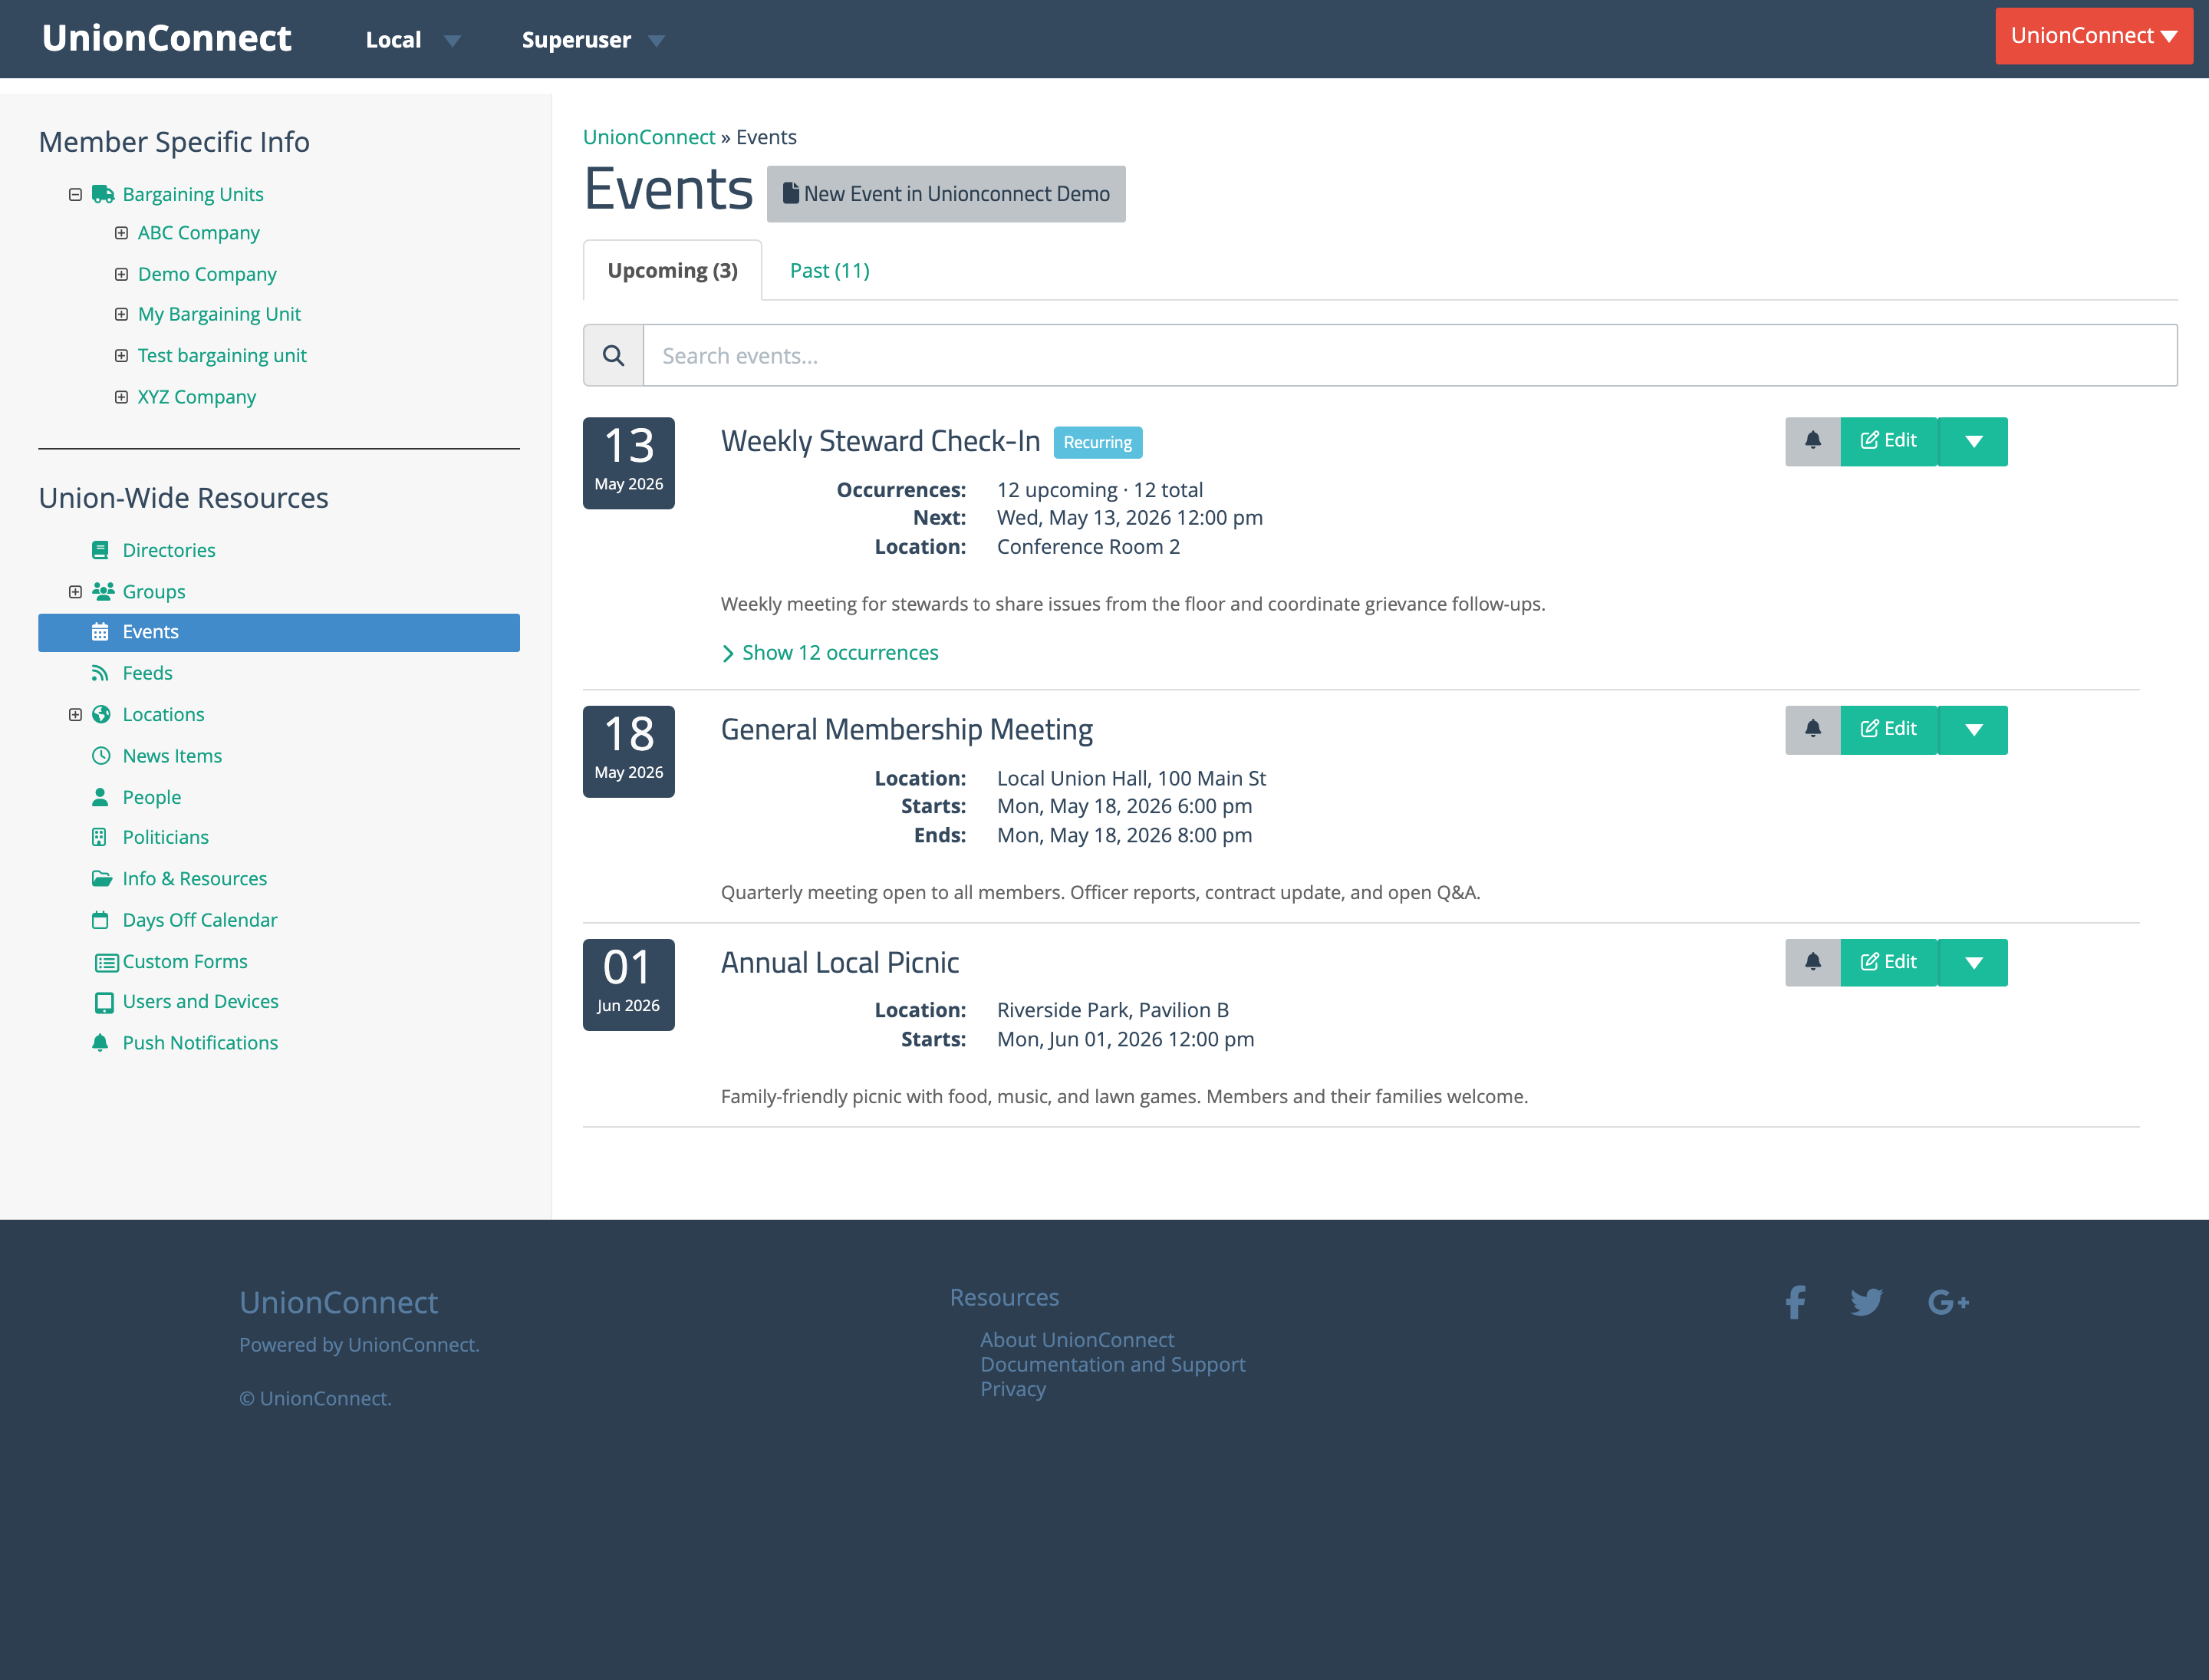
Like news items, events can be scoped union-wide or to a specific bargaining unit or group. The Events page lists each scope’s events on two tabs — Upcoming and Past — with a search box that filters titles, locations, and descriptions in real time. A single event card shows the date, title, location, start/end times, and a short description, with Edit, Subscribers, and Delete actions on the right.
Adding a One-Off Event
- Login to the dashboard
- From the left menu, click the Events item under whichever section you want to add it to (specific bargaining unit, group, or union-wide section)
- Click the New Event in… button at the top of the list
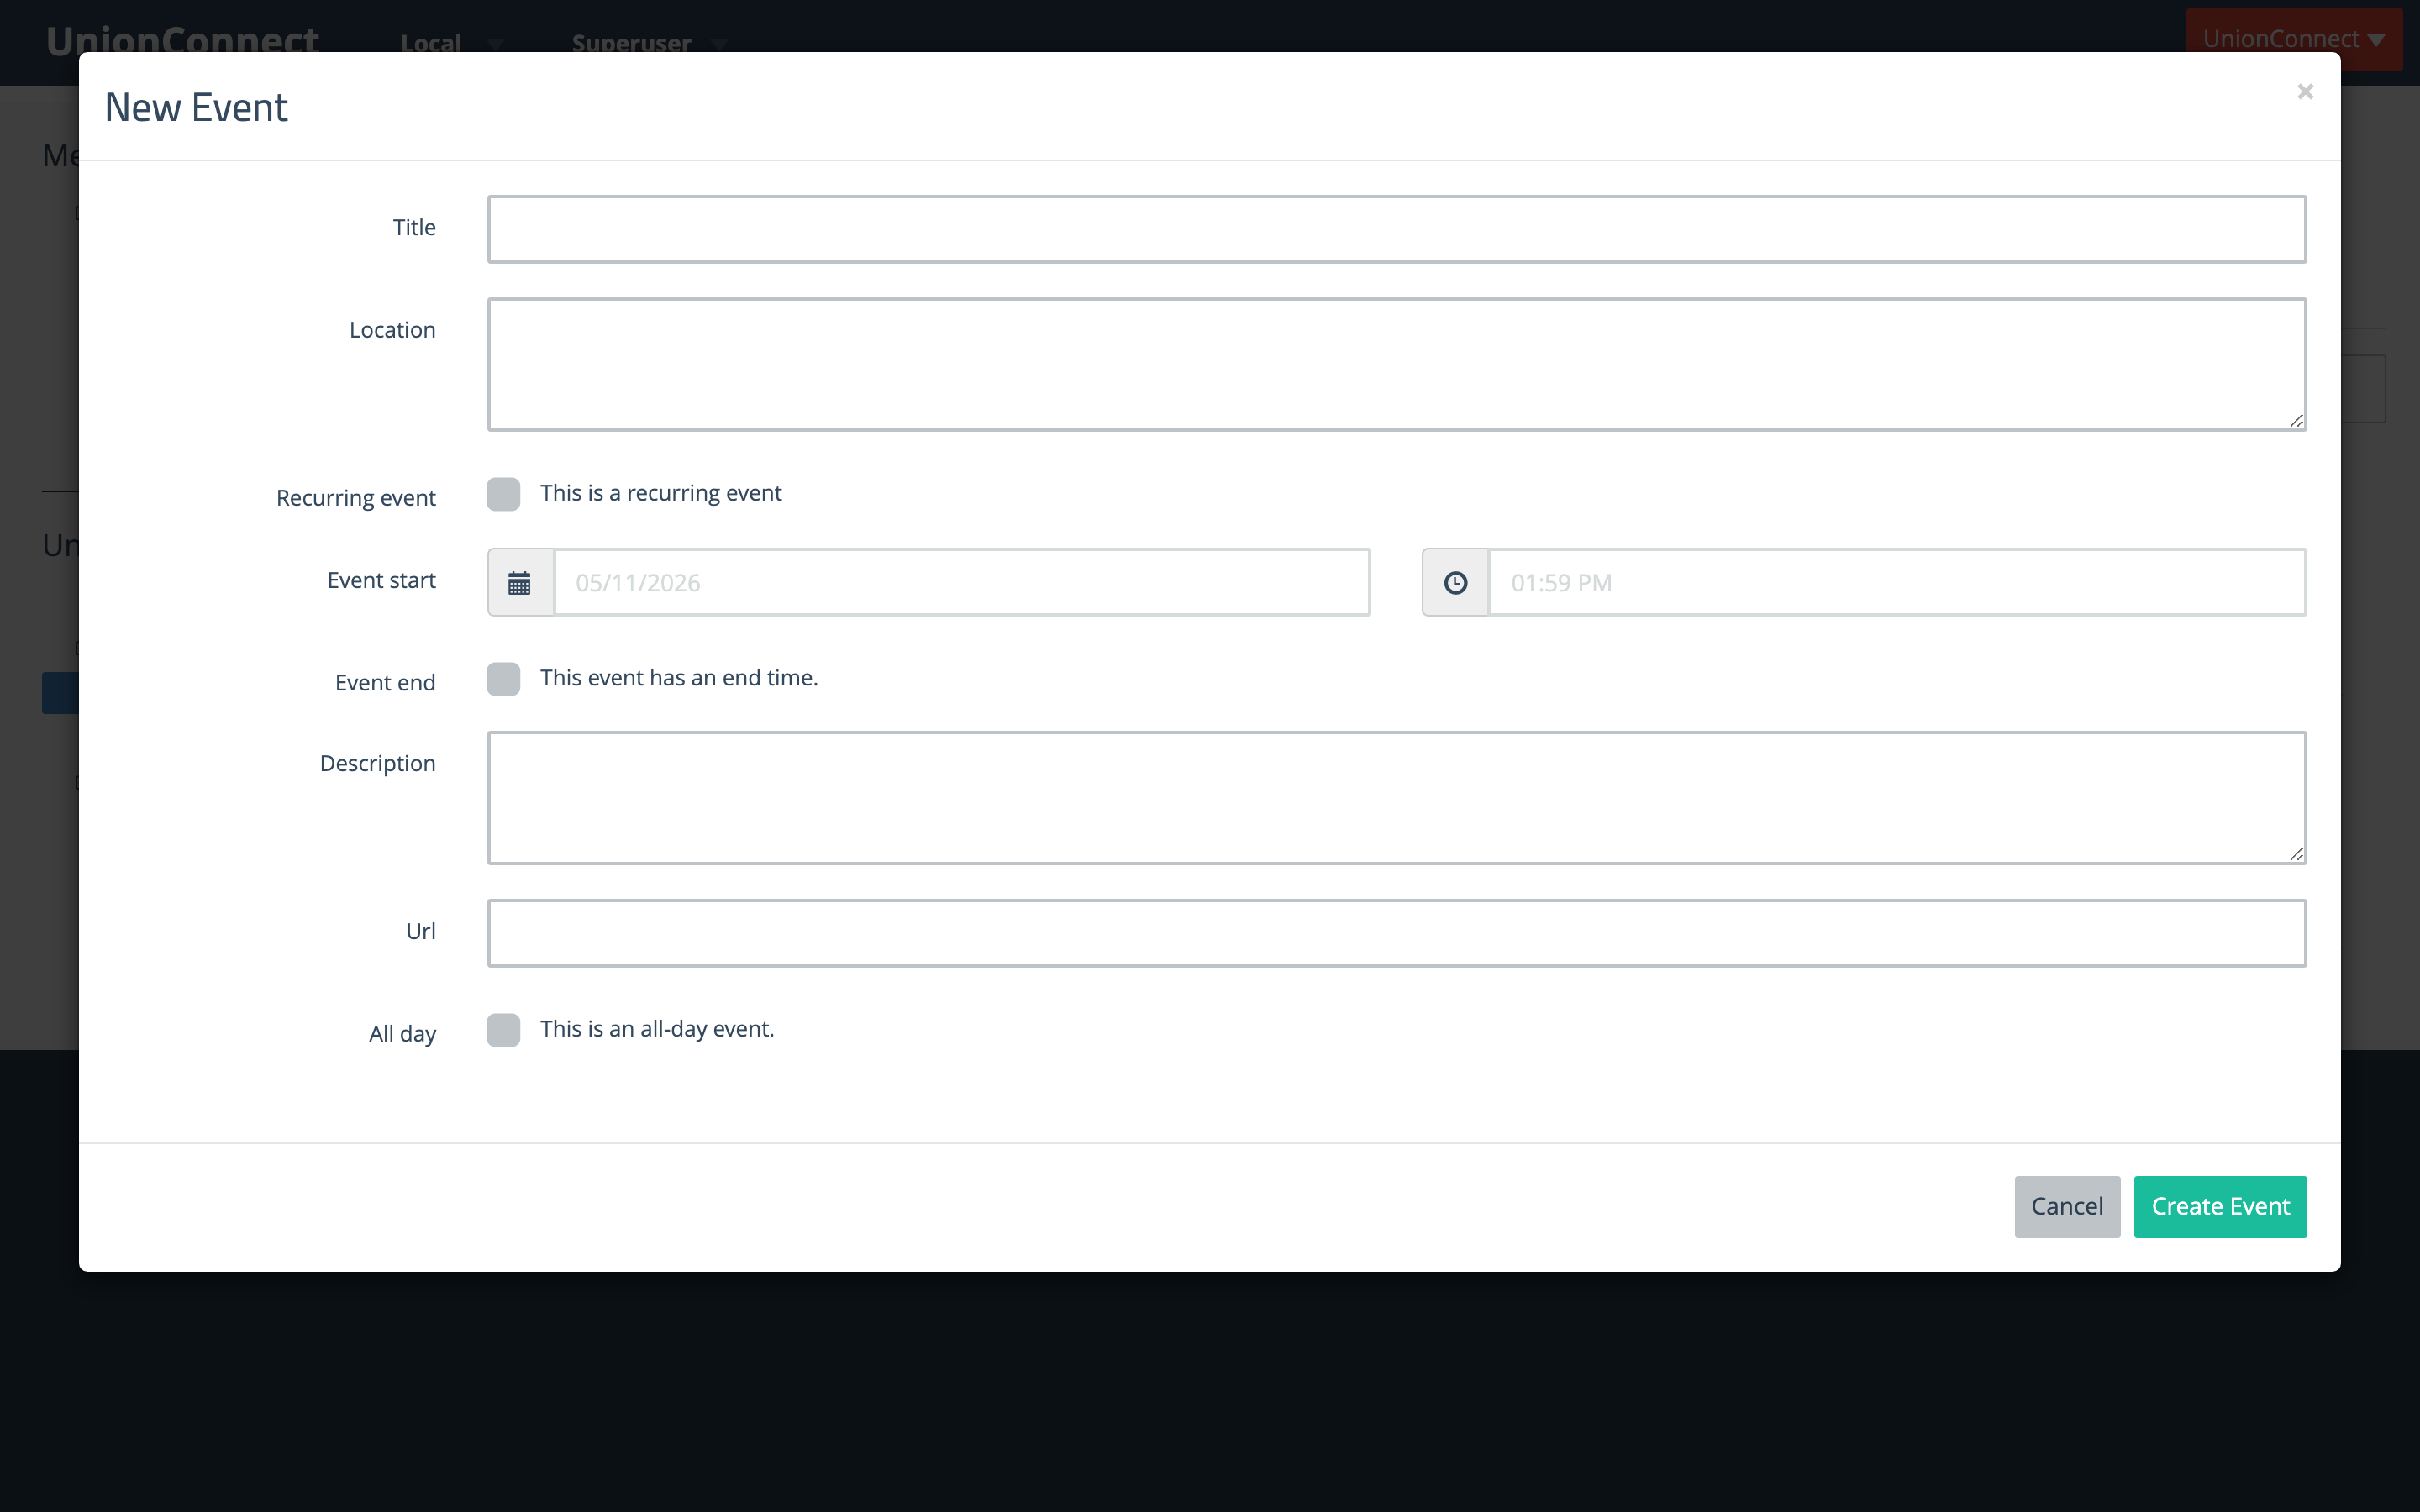
- Fill out the New Event form
- Title — The name of the event as it will appear in the app
- Location — Where the event will be held. Plain text is fine; addresses are not parsed for mapping
- Recurring event — Leave unchecked for a one-off. See Adding a Recurring Event Series below to schedule a repeating event
- Event start — Date and time the event starts
- Event end — Check This event has an end time to reveal a second date/time picker. Leave it unchecked if the event is open-ended
- Description — A short summary shown on the event detail screen
- URL — Optional link members can tap from the event detail screen (e.g. a Zoom link, RSVP form, or external announcement)
- All day — Check This is an all-day event to hide times in the app and show the event under its date only. Useful for things like picnics, conferences, or holidays
- Click Create Event to publish the event to the app
Adding a Recurring Event Series
For meetings or check-ins that repeat on a schedule, check This is a recurring event in the New Event modal. The form expands to show the rules that generate the series.
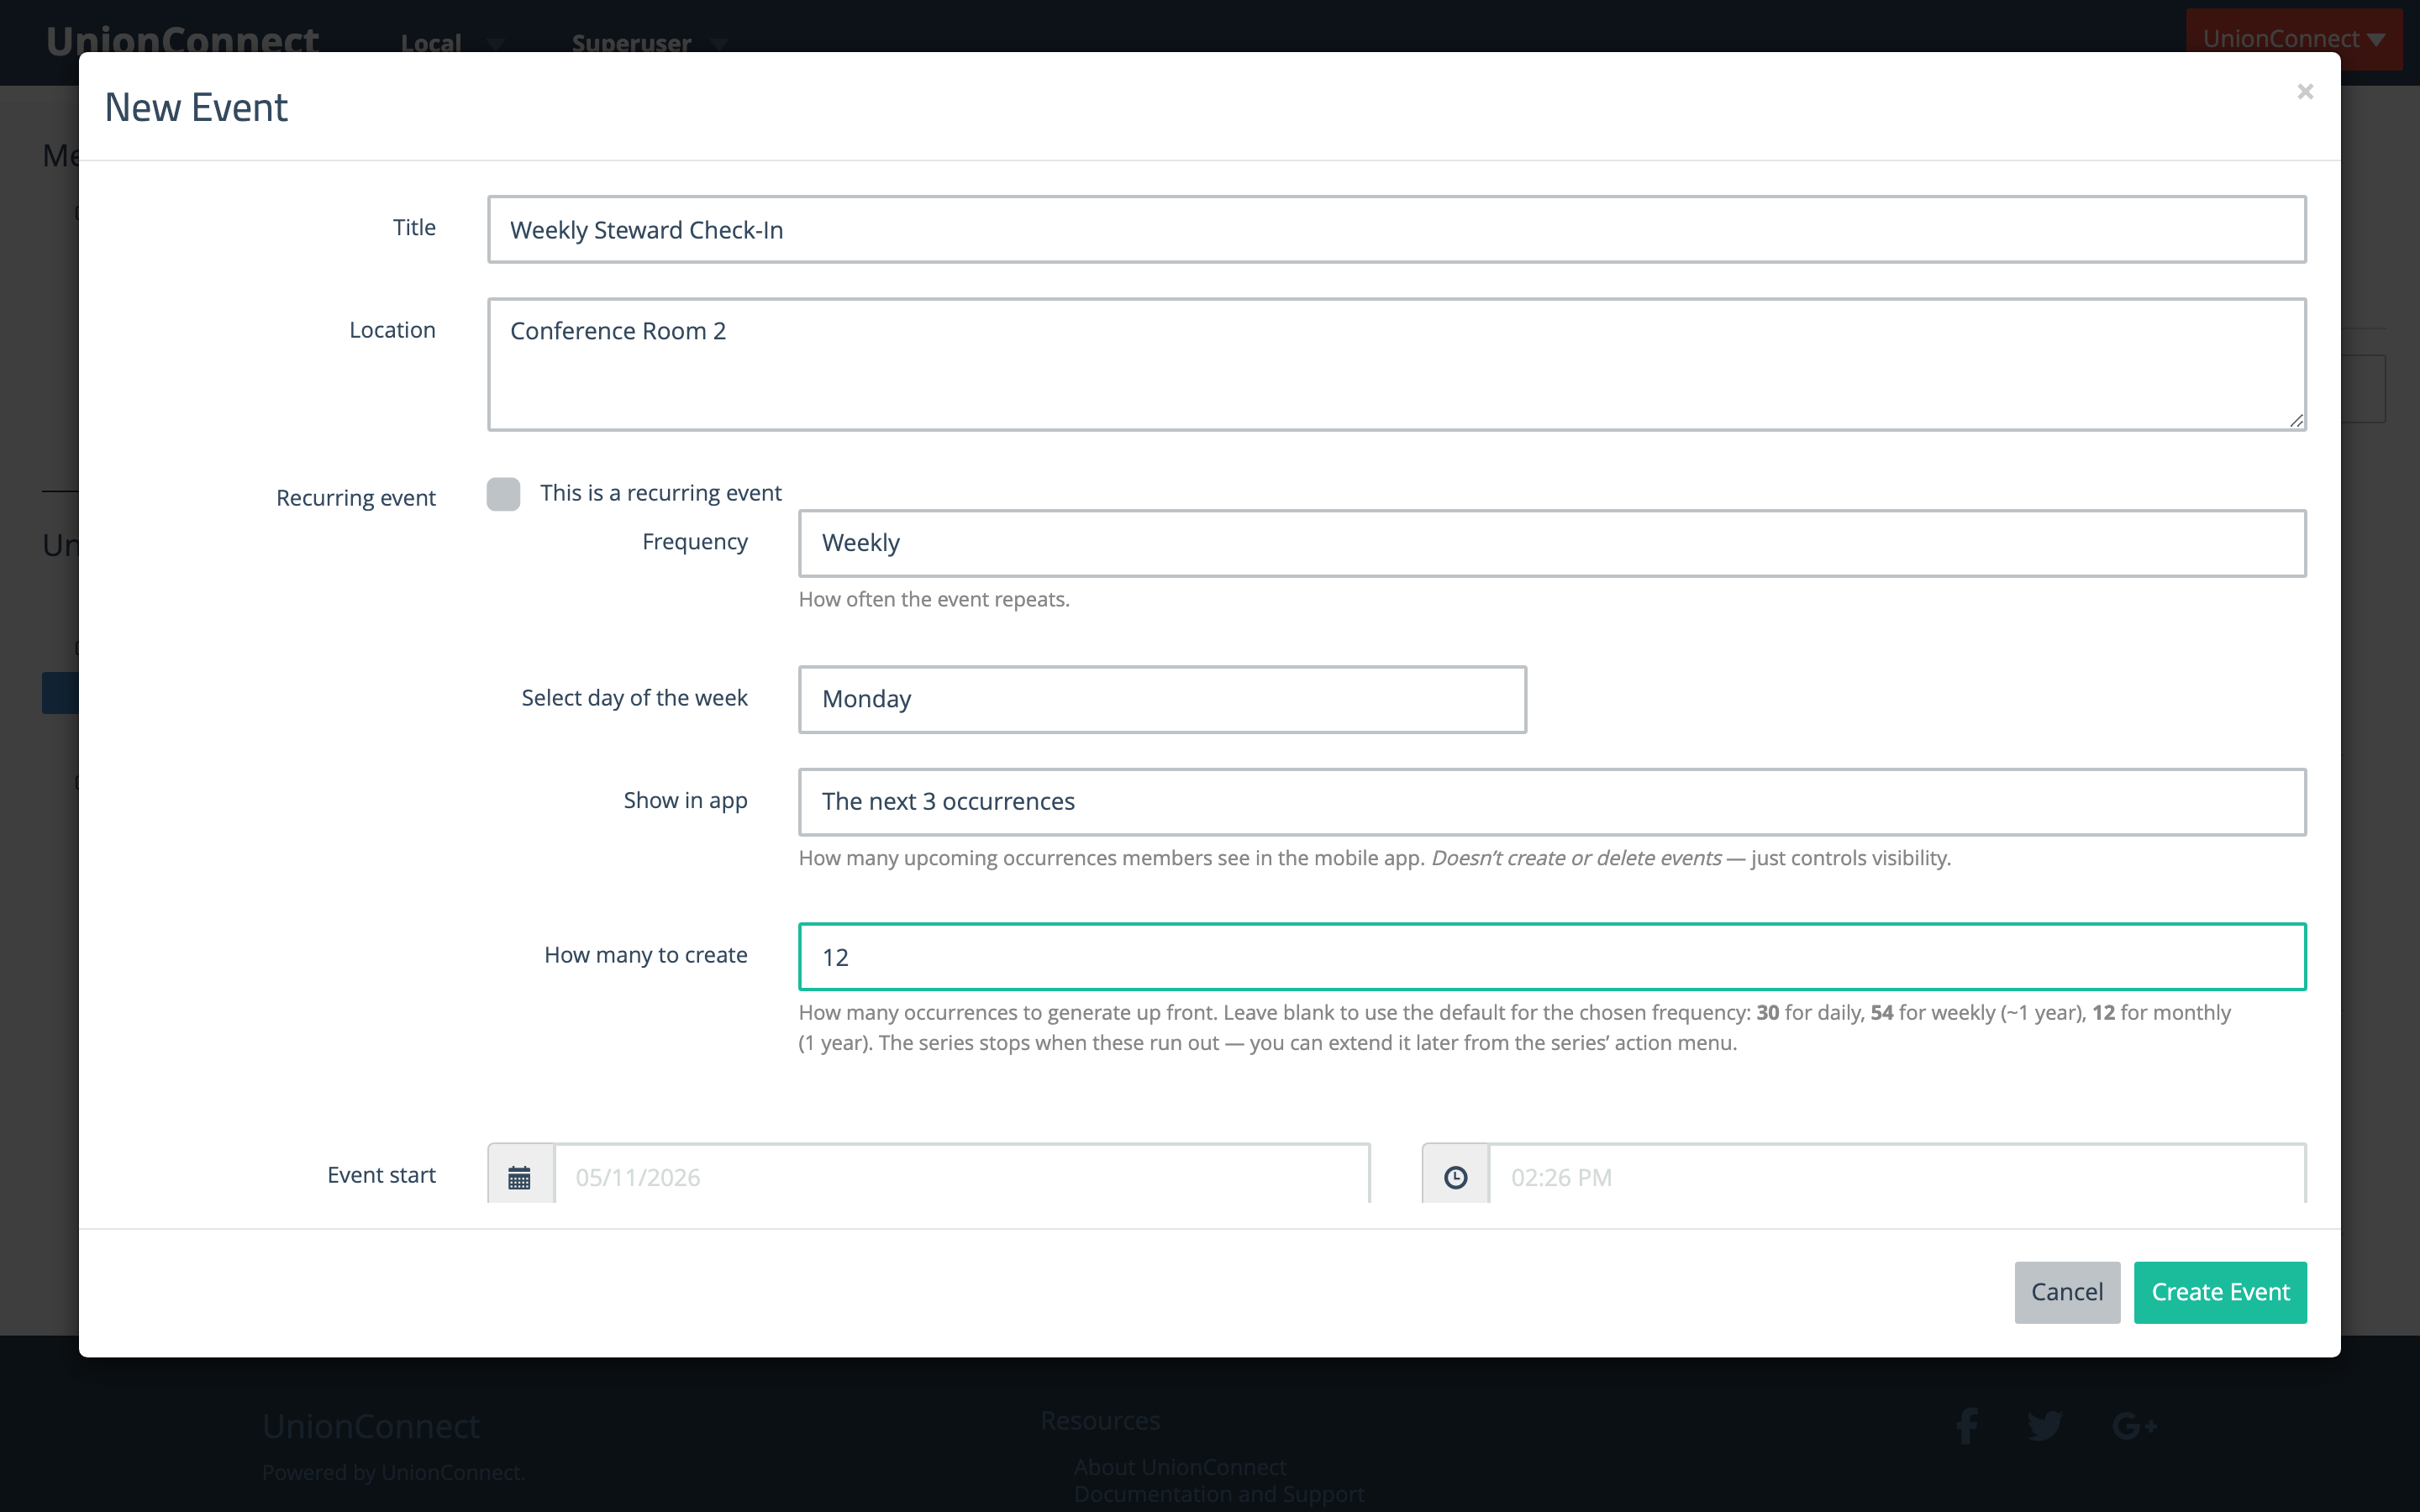
- Frequency — How often the event repeats. Choose Daily, Weekly, Monthly, or Yearly
- Day of the week / day of the month — For weekly events, pick which day. For monthly events, choose whether the event repeats on the same date each month or the same weekday (e.g. “the third Tuesday”)
- Show in app — Controls how many upcoming occurrences members see in the mobile app. Choose All upcoming occurrences, The next 3 occurrences, The next occurrence only, etc. This only changes visibility — it does not create or delete events
- How many to create — How many occurrences to generate up front. Leave blank to use the default for the chosen frequency (30 for daily, 54 for weekly — about a year, 12 for monthly, 1 for yearly). The series stops when these run out; you can always extend it later from the series action menu
- Event start — The date and time of the first occurrence. All subsequent occurrences are generated from this anchor using the rules above
When you click Create Event, the dashboard generates every occurrence at once and groups them in the list under a single row marked with a Recurring badge. The series row shows the next upcoming occurrence’s date, location, and time, plus a count of upcoming and total occurrences.
Viewing the Occurrences in a Series
A recurring series collapses every occurrence into a single row to keep the list manageable. To see every date in the series, click the Show N occurrences link below the series description. Each occurrence is then listed individually with its date, status (Upcoming, Past, or Cancelled), and per-occurrence Edit, Subscribers, and Delete buttons.
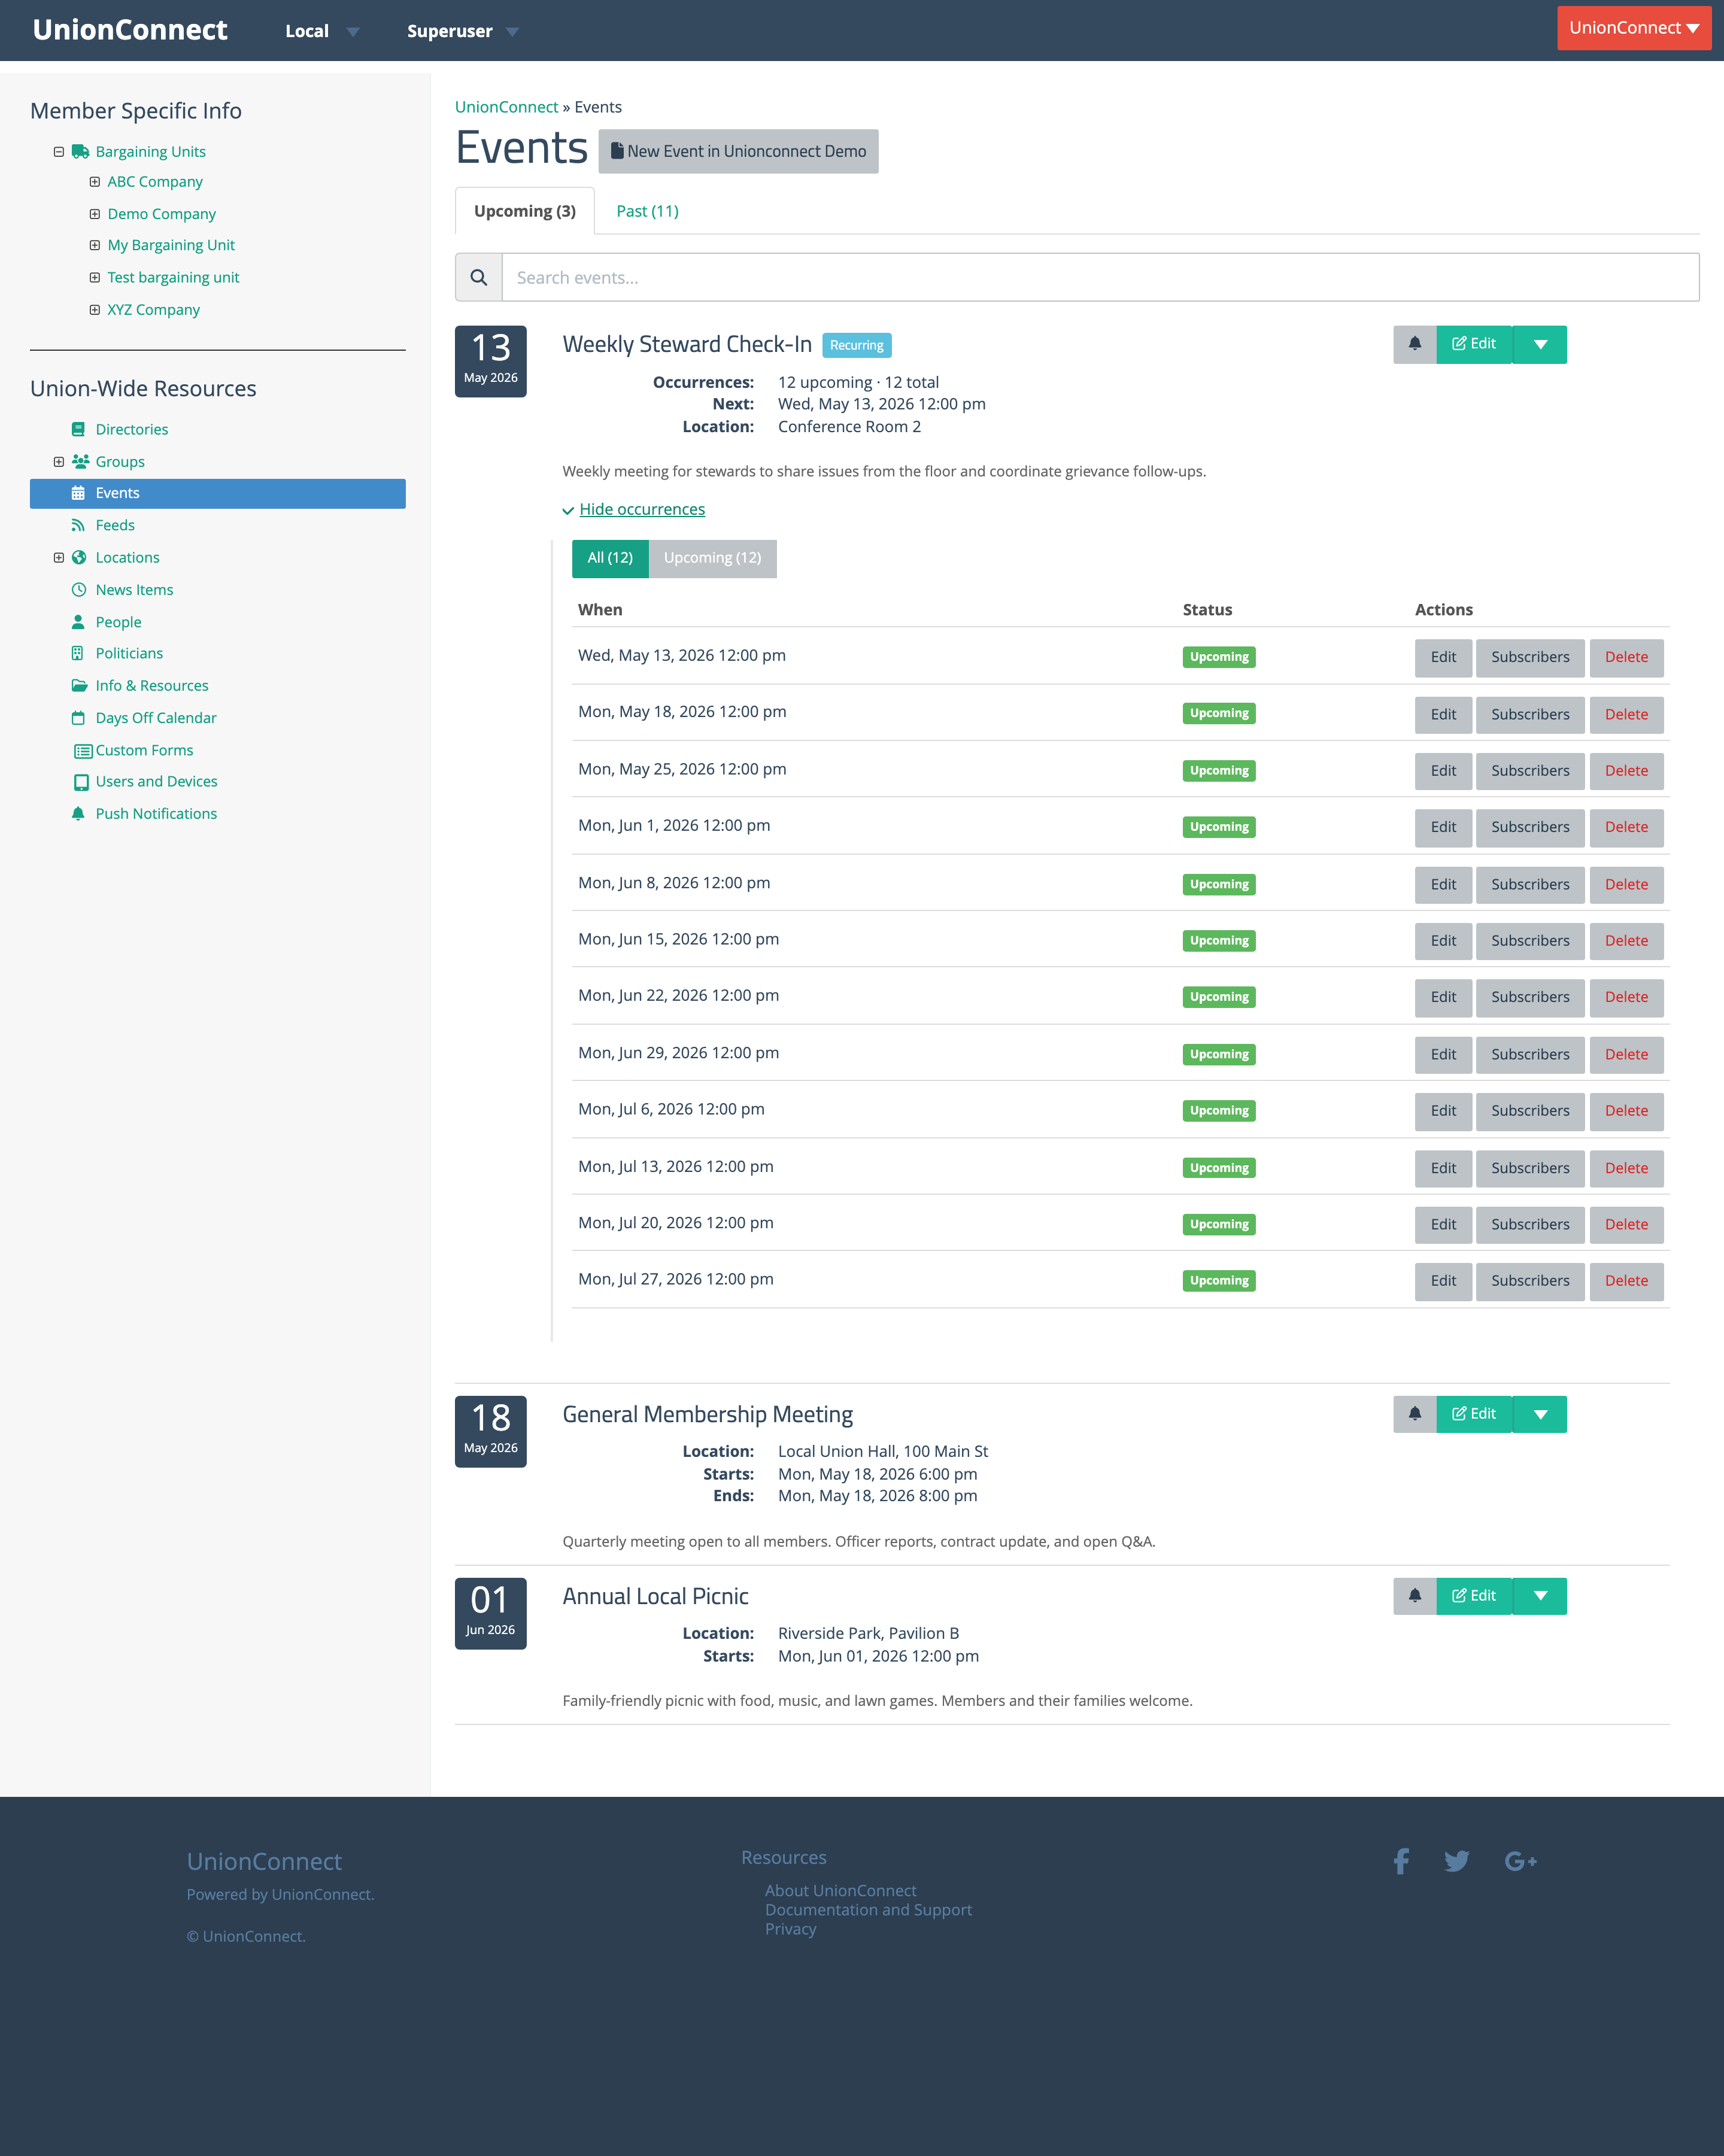
Click Hide occurrences to collapse the table again.
Editing an Event
For a one-off event, click the Edit button on the event row. The Edit Event modal has the same fields as the New Event modal, pre-filled with the event’s current values. Change any of them and click Update Event to save.

Recurring events have two layers of editing:
- One occurrence at a time — Expand the series with Show N occurrences, then click Edit on the specific occurrence you want to change. This is useful for one-off changes like a holiday-week reschedule or a different location for a single date. Per-occurrence edits do not affect any other occurrence in the series
- The entire series at once — Use the series action menu (described below) to edit every occurrence together, or to change the recurrence rules themselves
The Series Action Menu
To the right of every recurring series row is a green Edit button with a dropdown caret. Clicking the caret reveals the actions that apply to the whole series.

- View next occurrence — Opens the event detail page for the next upcoming occurrence
- Subscribers (next) — Opens the Subscribers page for the next upcoming occurrence (see Subscribers and RSVPs below)
- Edit series details — Change the title, location, URL, and description for every occurrence at once
- Edit recurrence rules — Change the frequency, the day, how many occurrences exist, or how many show in the app
- Delete entire series — Remove every occurrence in the series in one step
Edit Series Details
Use this when the title, location, URL, or description should change for every occurrence in the series. Filling in any field overwrites that field on every occurrence; leaving a field blank clears it across the series. The modal shows the total occurrence count in its header so you know what you’re about to change.
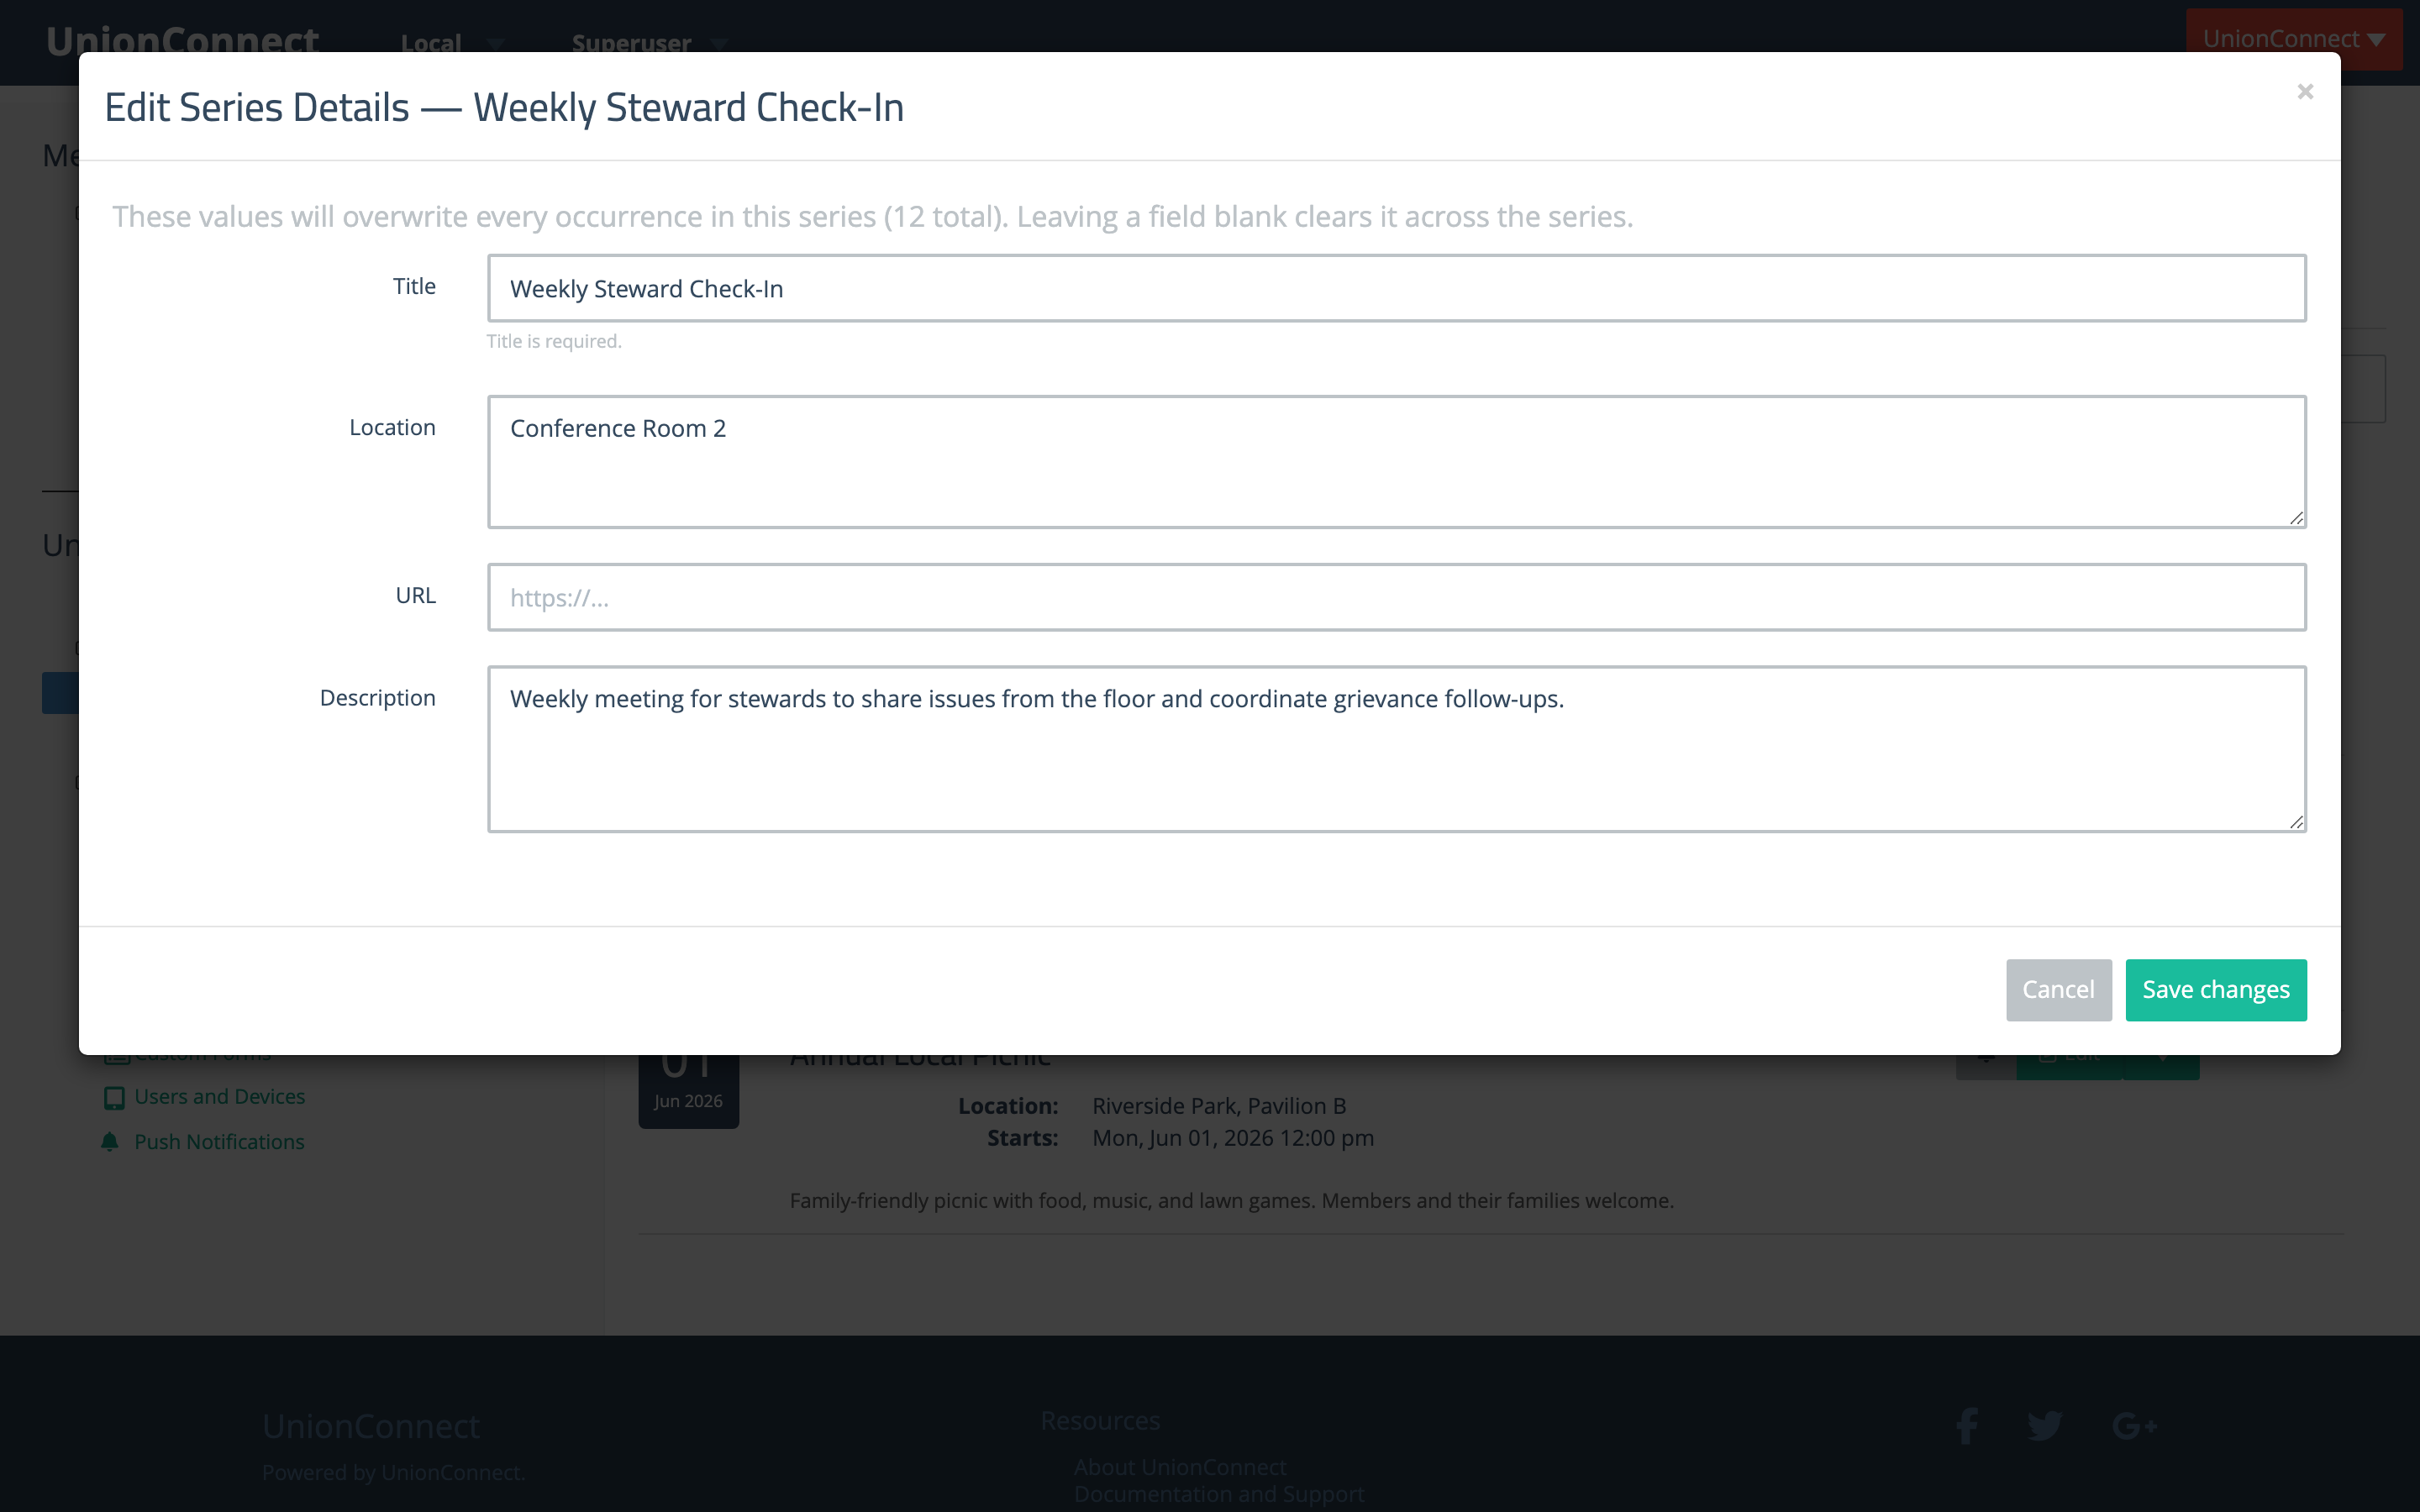
Click Save changes to push the new values to every occurrence.
Edit Recurrence Rules
Use this when the schedule itself needs to change — for example, switching a weekly meeting to monthly, moving from Mondays to Tuesdays, or extending a series that’s about to run out of occurrences.
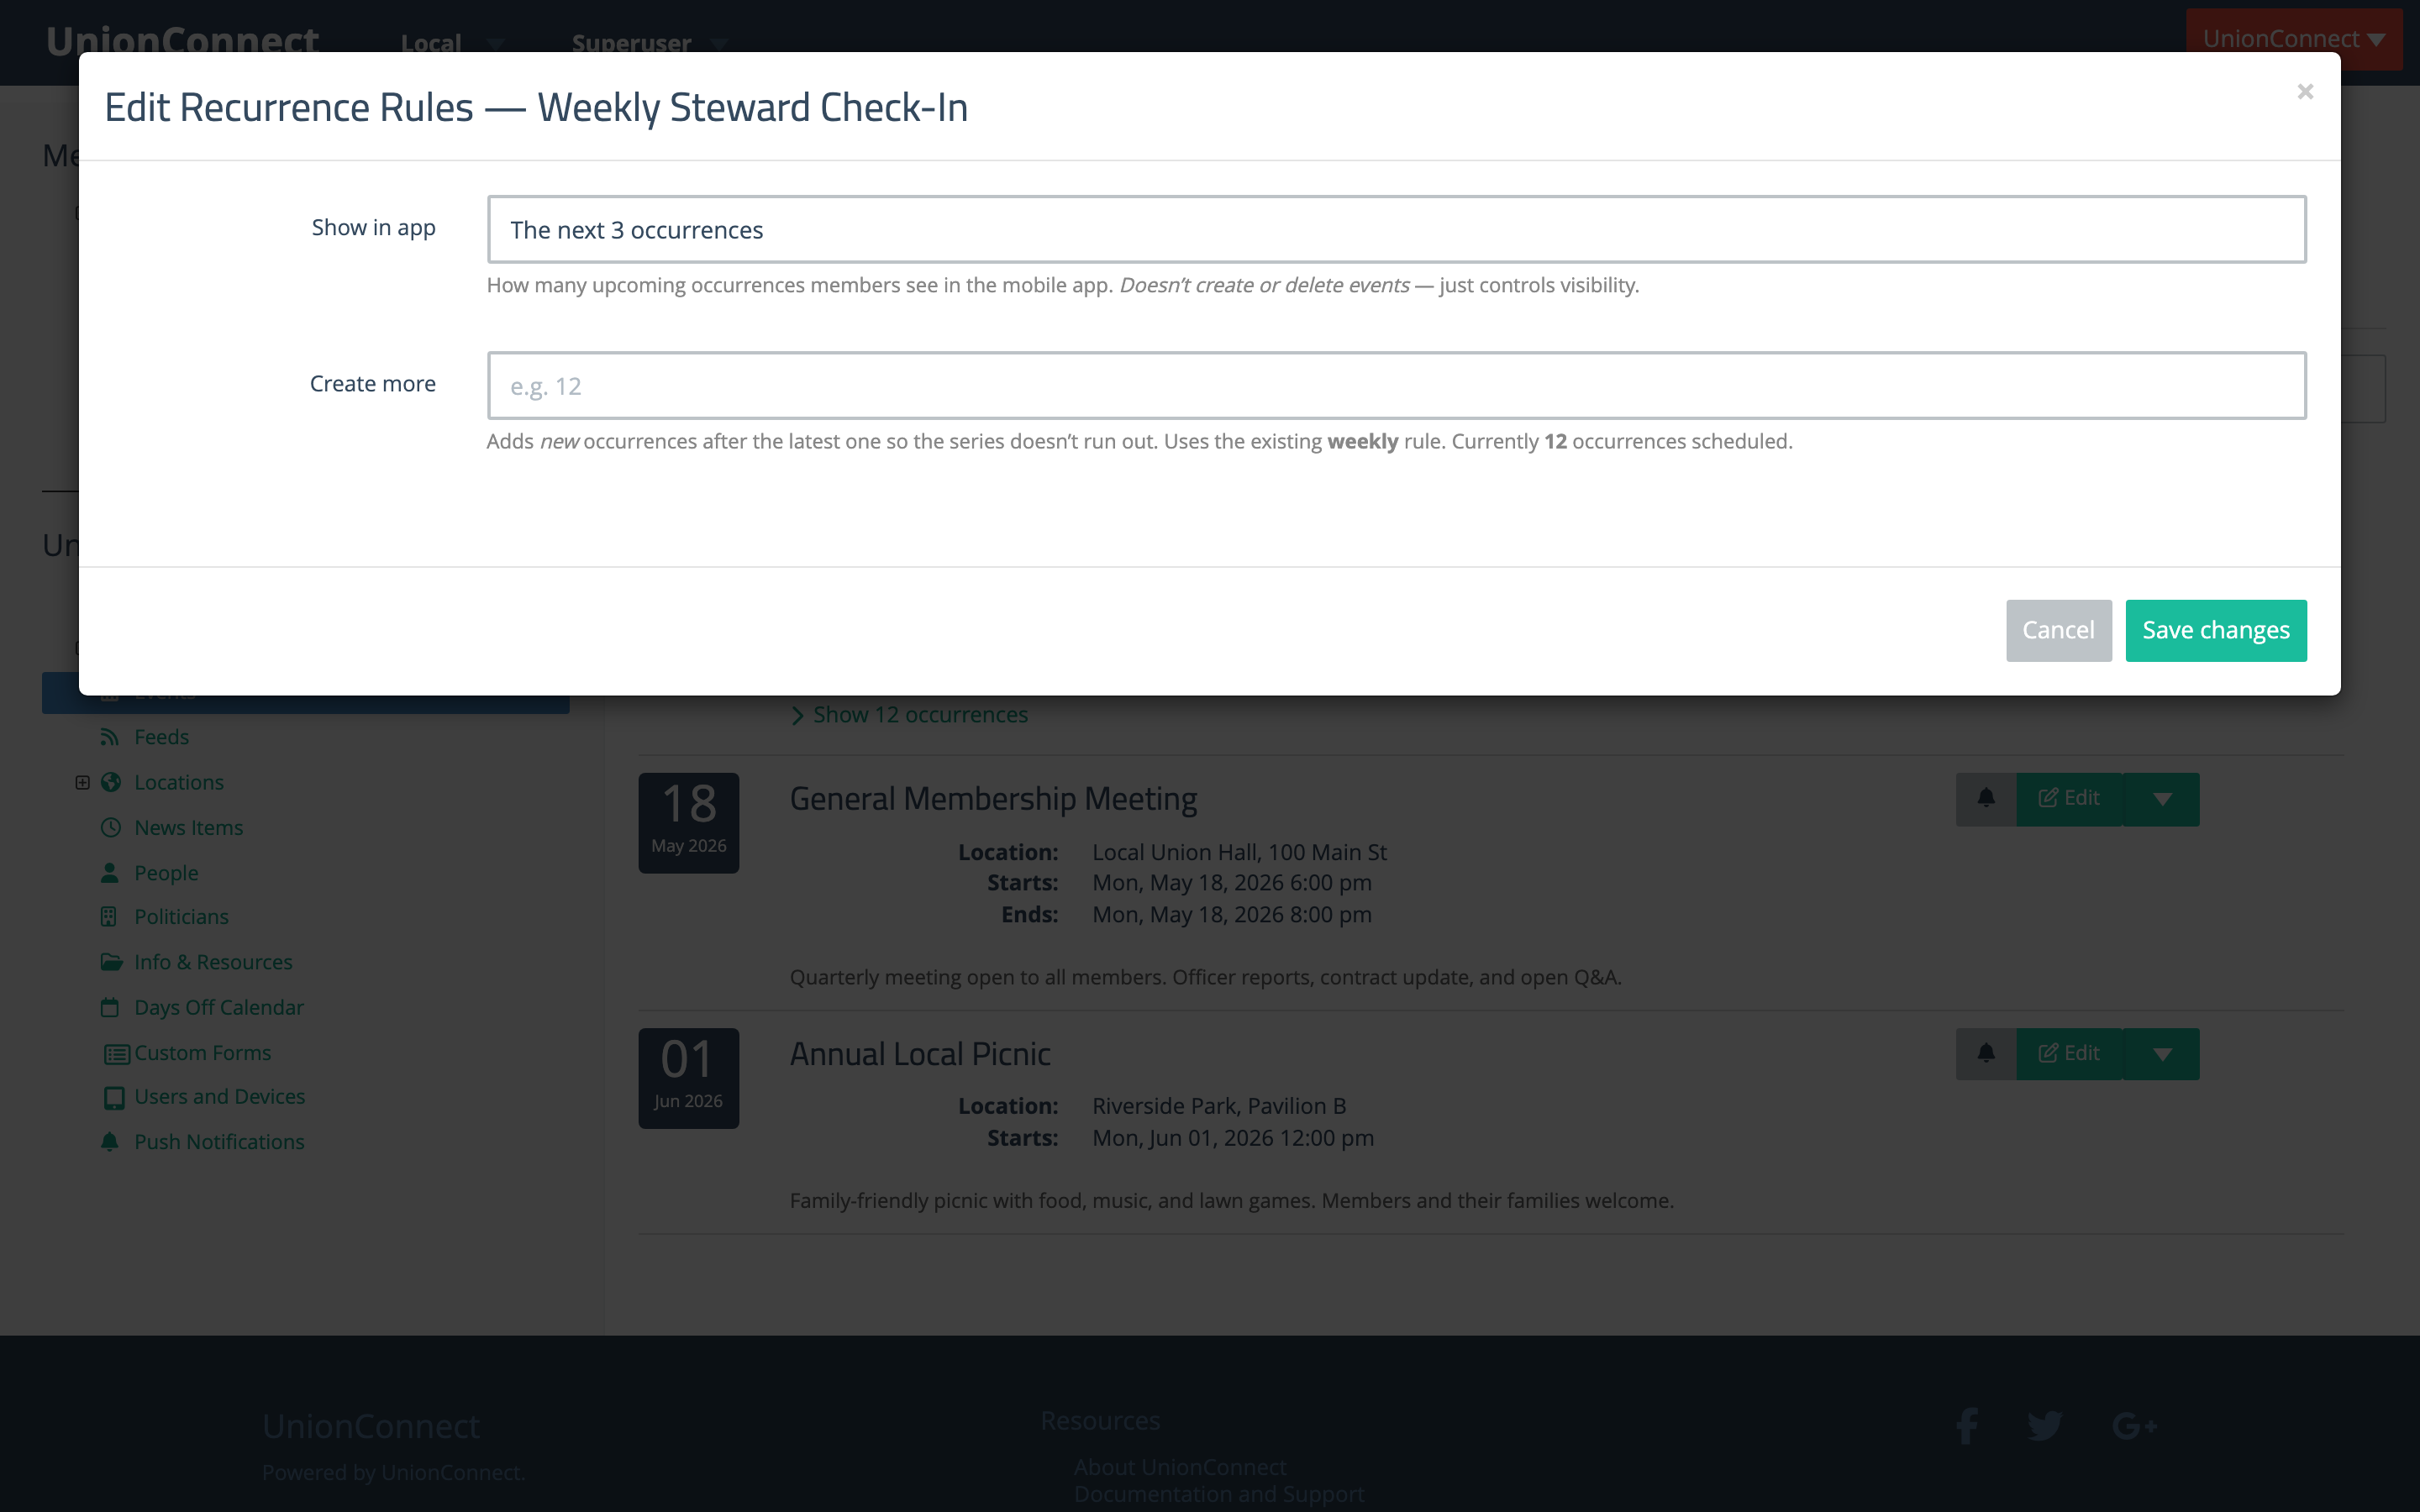
The fields work the same way as in the New Event modal. Past occurrences are preserved as-is; only upcoming occurrences are regenerated from the new rules when you click Save changes.
Subscribers and RSVPs
Every event has a Subscribers button on its row. This opens a page that shows who has responded to the event in the app along with their response (Going, Maybe, or Not Going).
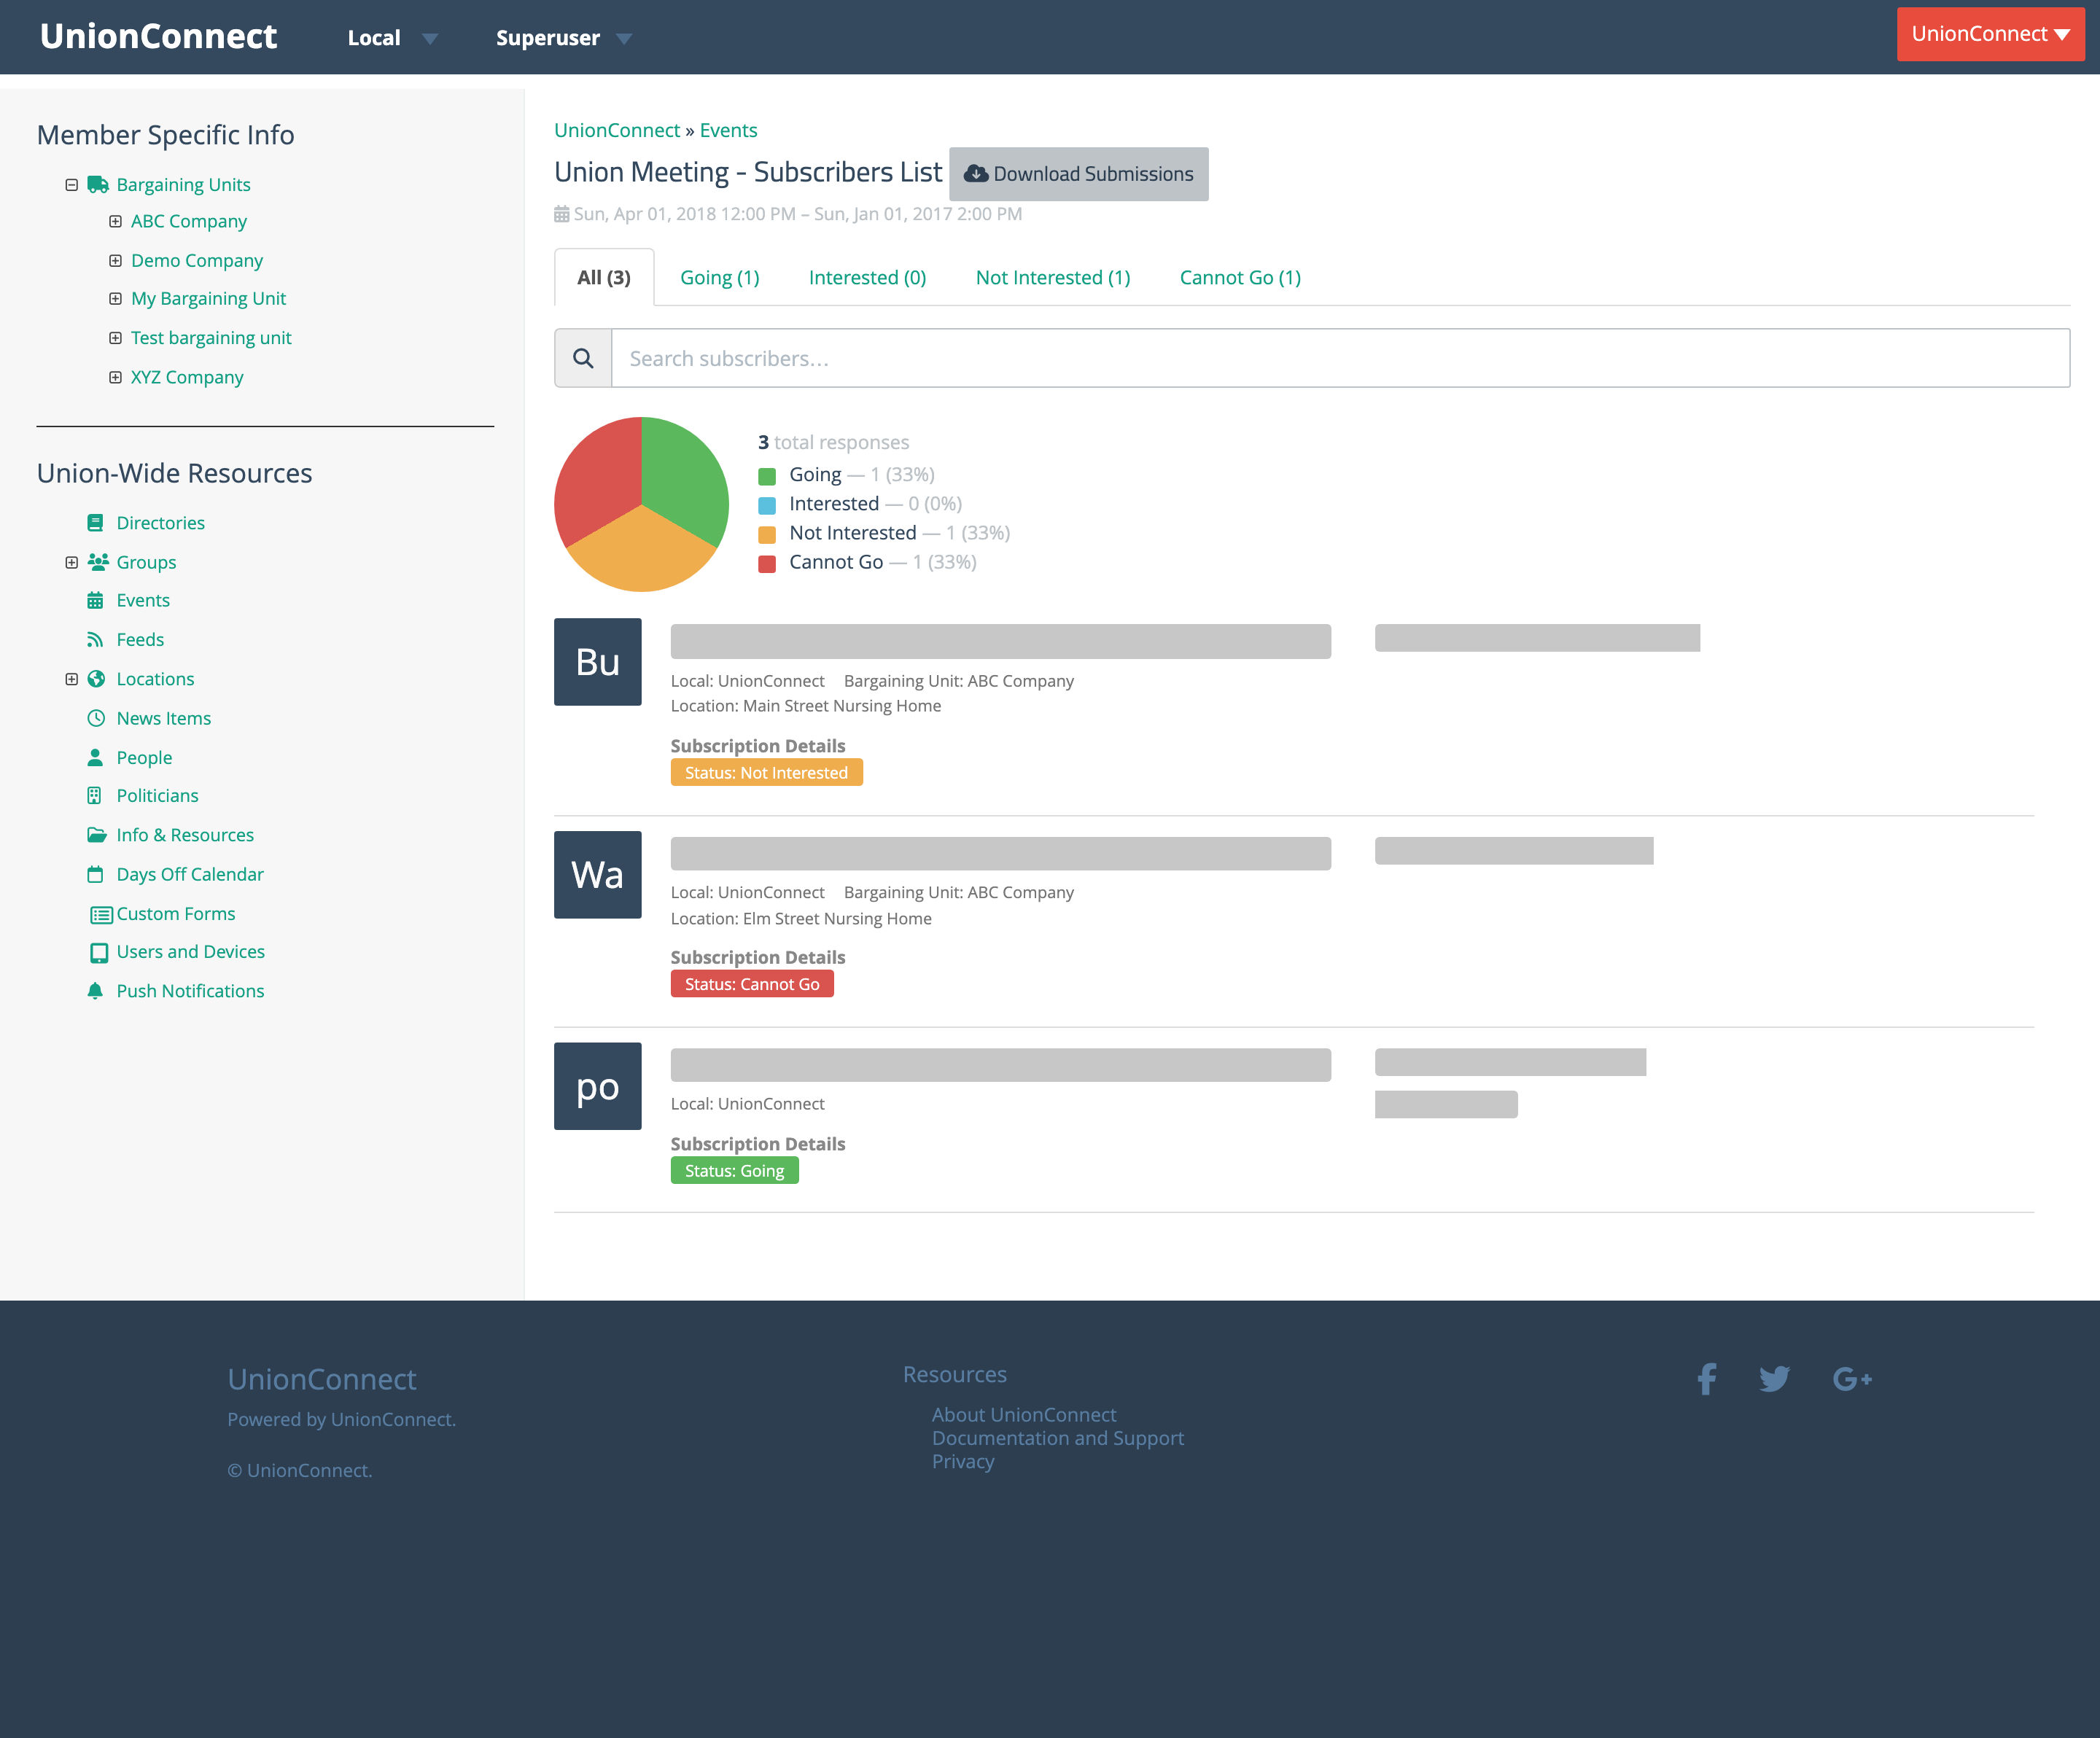
The page shows:
- A pie-chart breakdown of responses by status, with totals for Going, Maybe, and Not Going
- A list of every member who has responded, with their name, contact info, and their current response
- The number of members who were notified about the event but haven’t responded yet
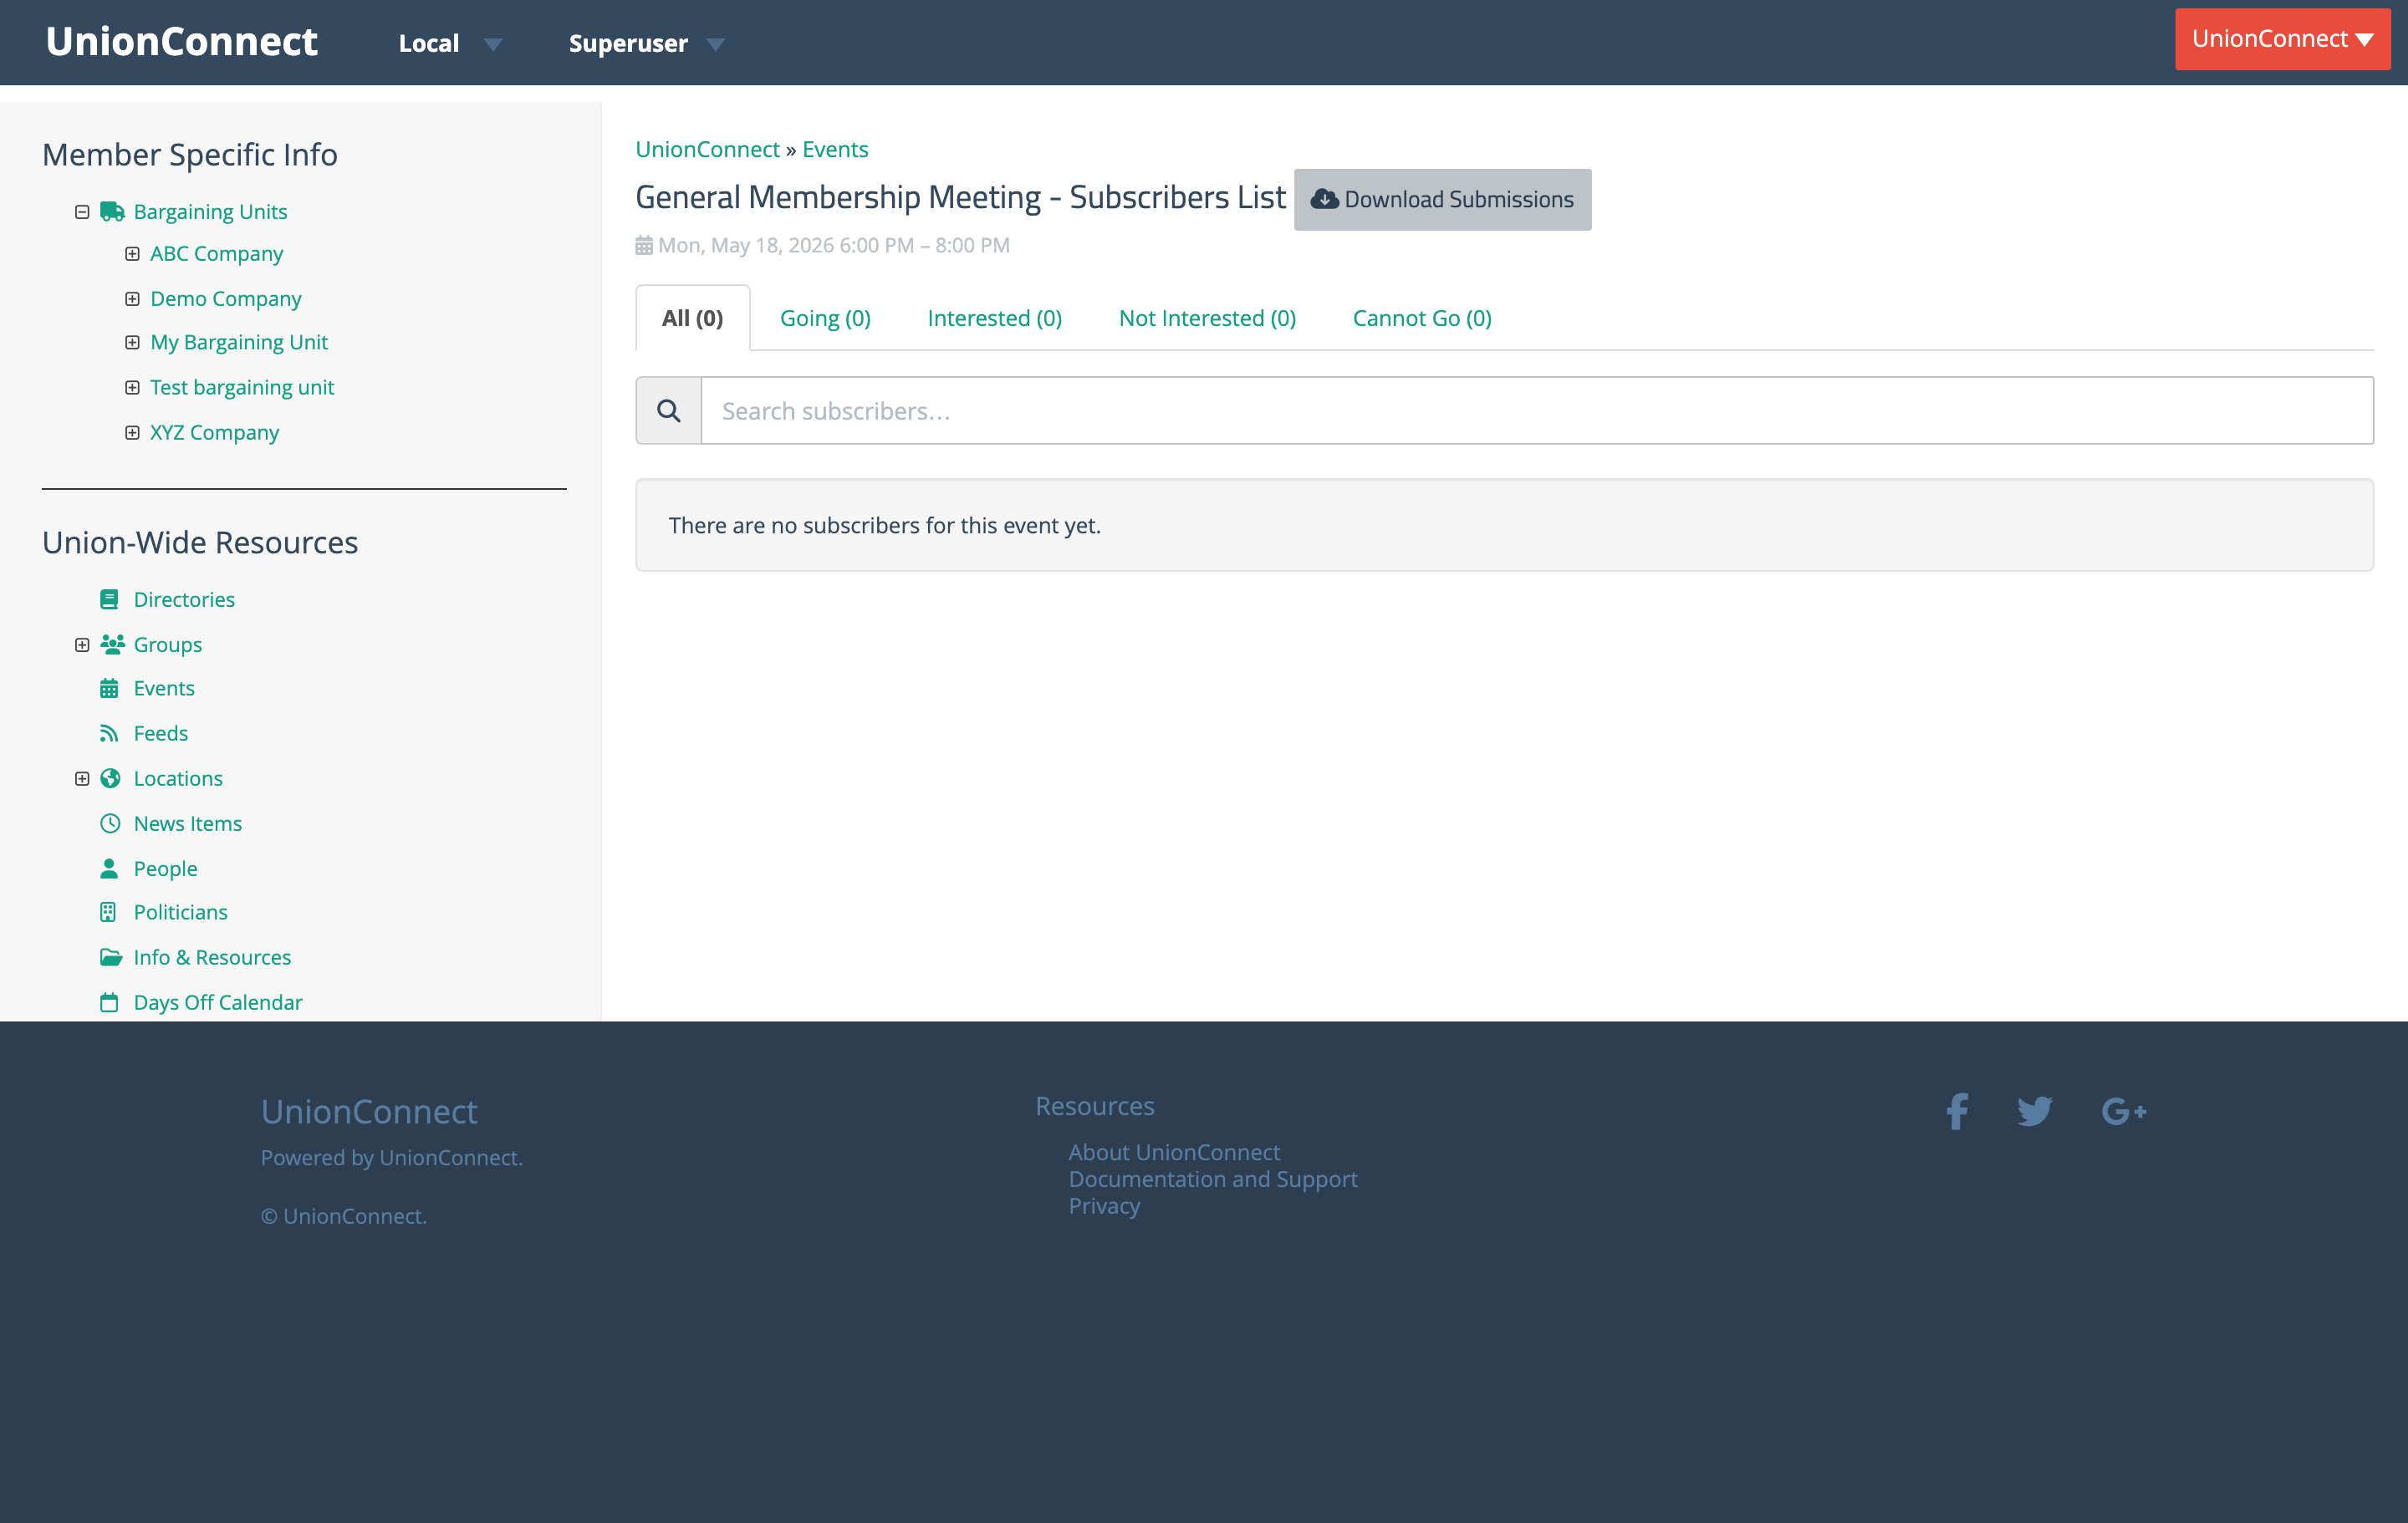
If no one has responded yet, the page shows a friendly empty state instead of an empty chart.
For a recurring series, each occurrence has its own subscribers list. The Subscribers (next) link in the series action menu is a shortcut to the list for the next upcoming occurrence; to view subscribers for any other occurrence, expand the series and click Subscribers on that row.
Searching Events
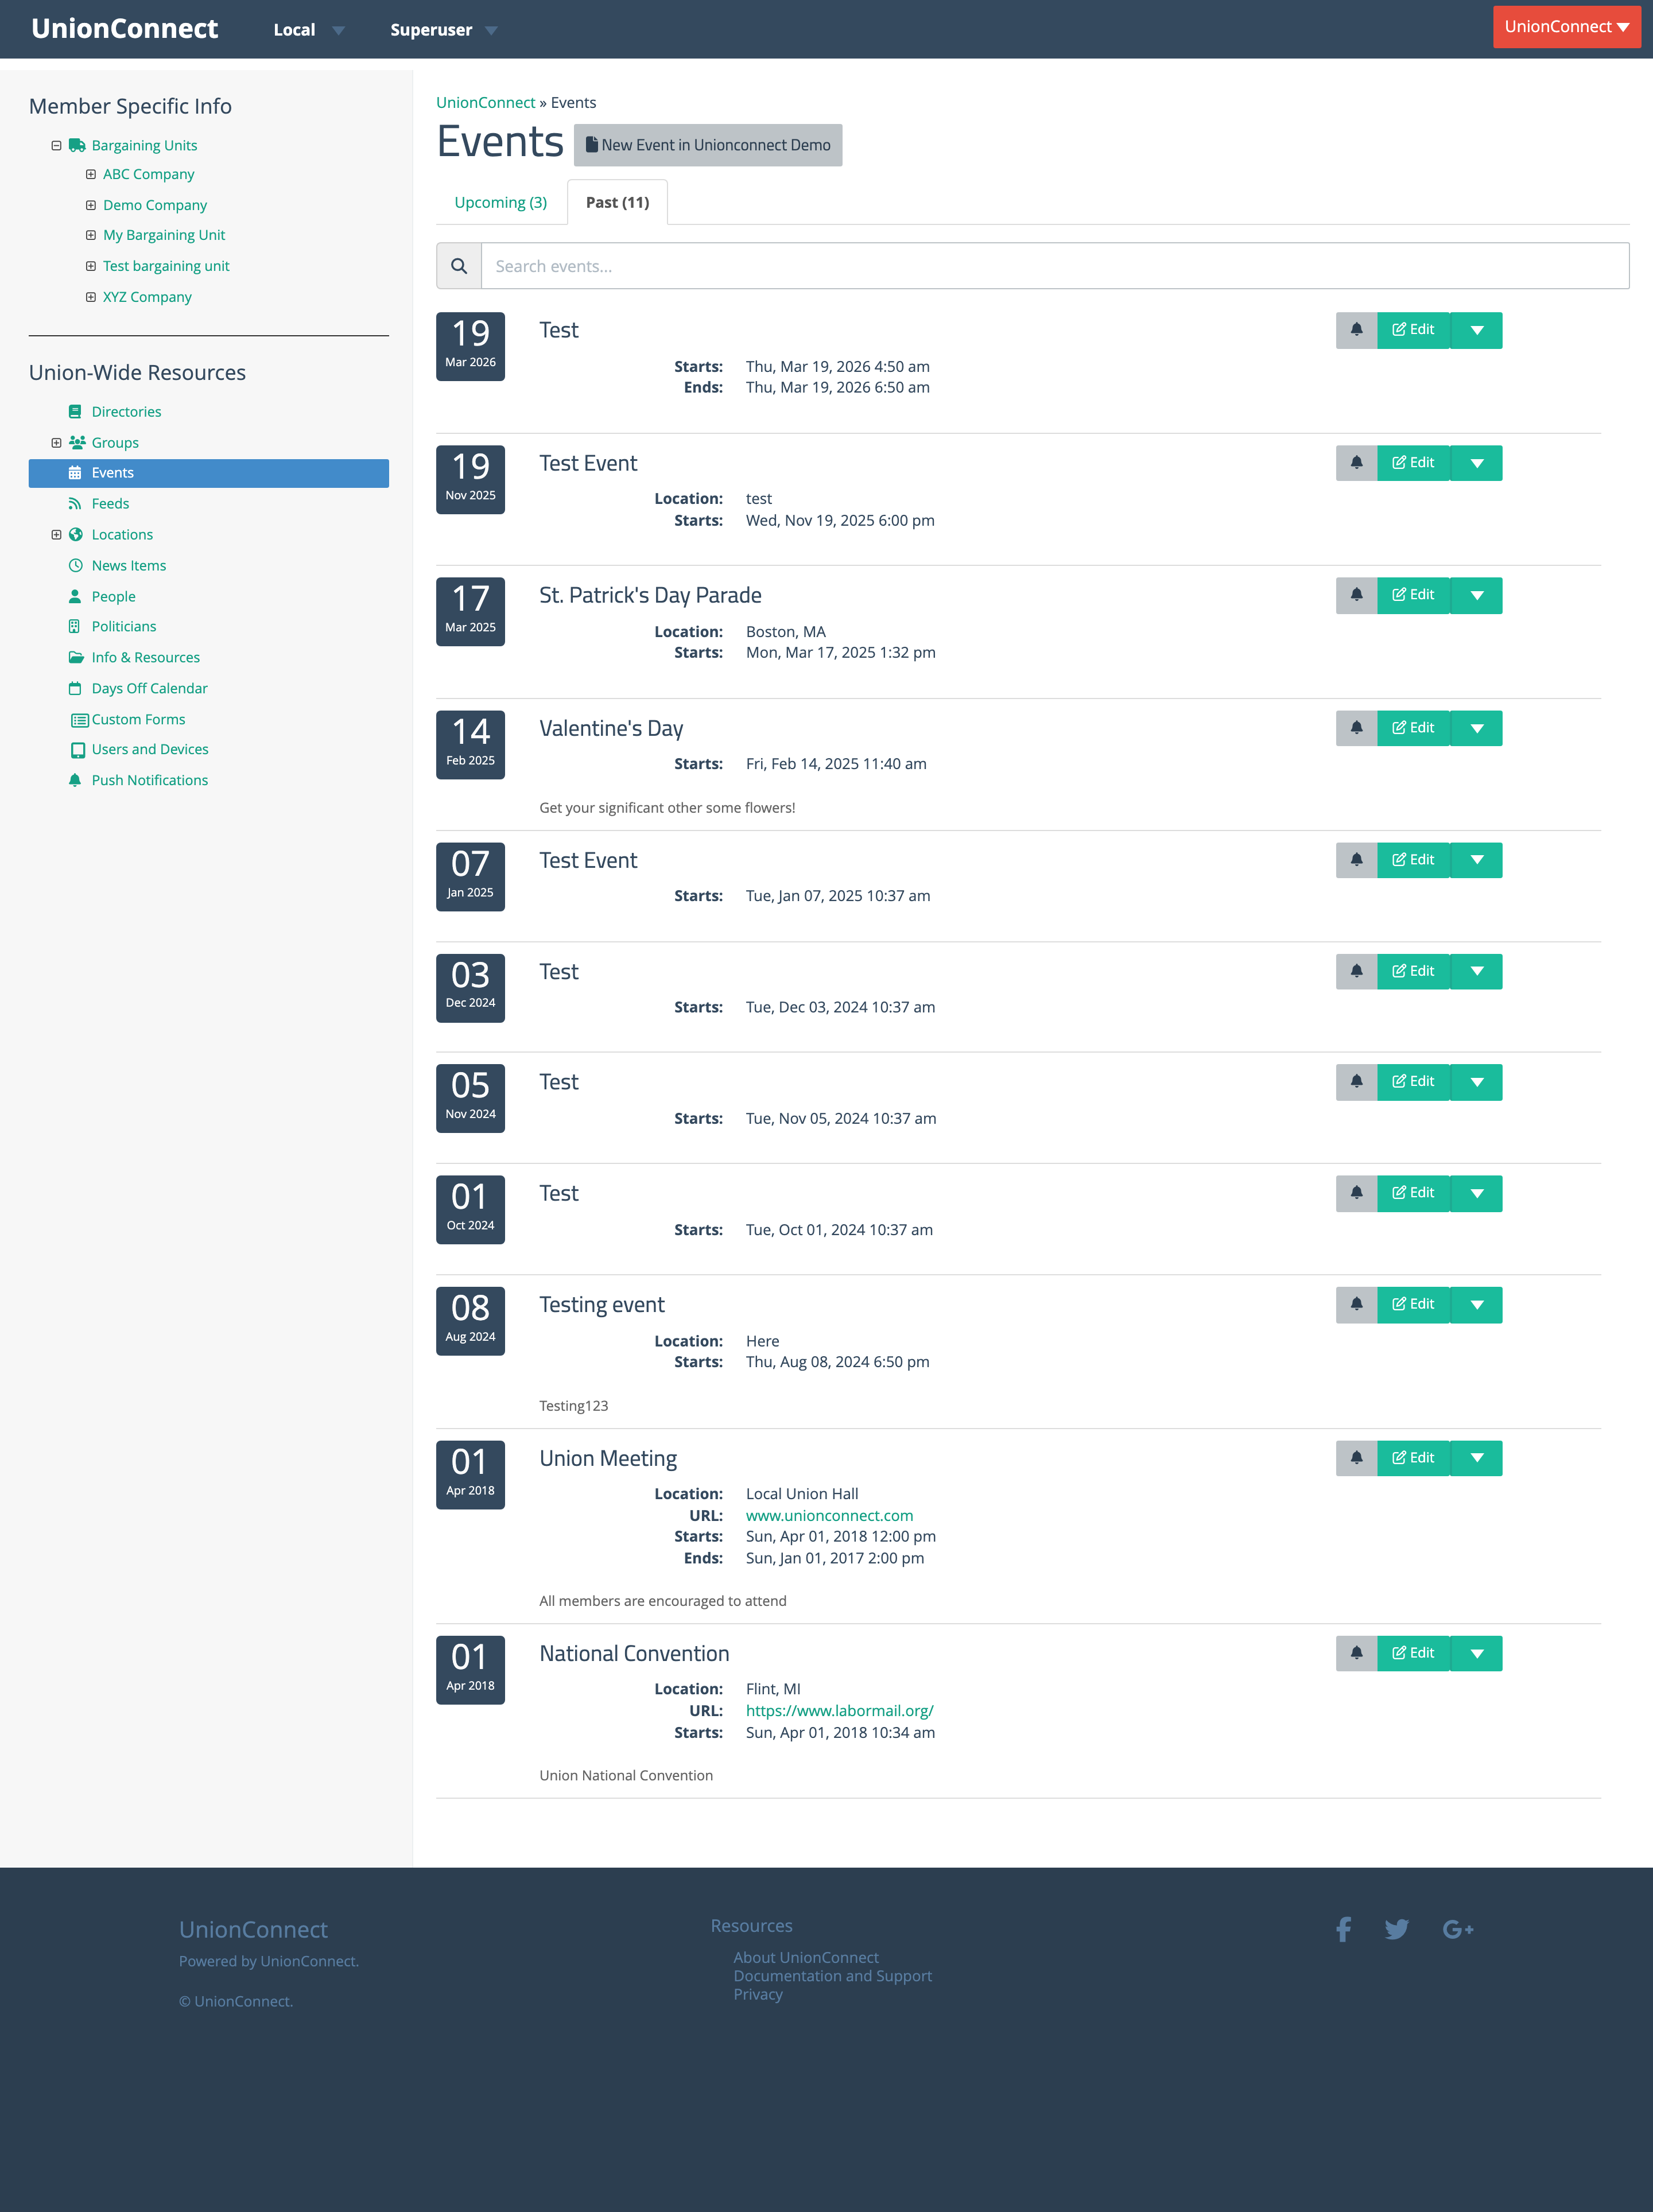
The search box at the top of the Events list filters as you type. Matches are scored across the event title, location, and description, so you can find an event by any of those fields. The tab counts in the page header (e.g. Upcoming (3), Past (11)) update to reflect how many events match. Clear the search box to return to the full list.
Past Events
Once an event’s start time passes, it moves from the Upcoming tab to the Past tab. Past events stay searchable and keep their subscriber lists, so you can come back later to see who responded. Past events are not deleted automatically.
Deleting an Event
- A one-off event: Click the red Delete button on the event row and confirm
- A single occurrence of a recurring series: Expand the series with Show N occurrences, then click Delete on the specific occurrence. The rest of the series is left intact
- An entire recurring series: Open the series action menu (the caret next to the green Edit button) and choose Delete entire series. Every occurrence — past and future — is removed
Deleting an event also clears its RSVP records.